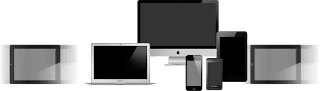
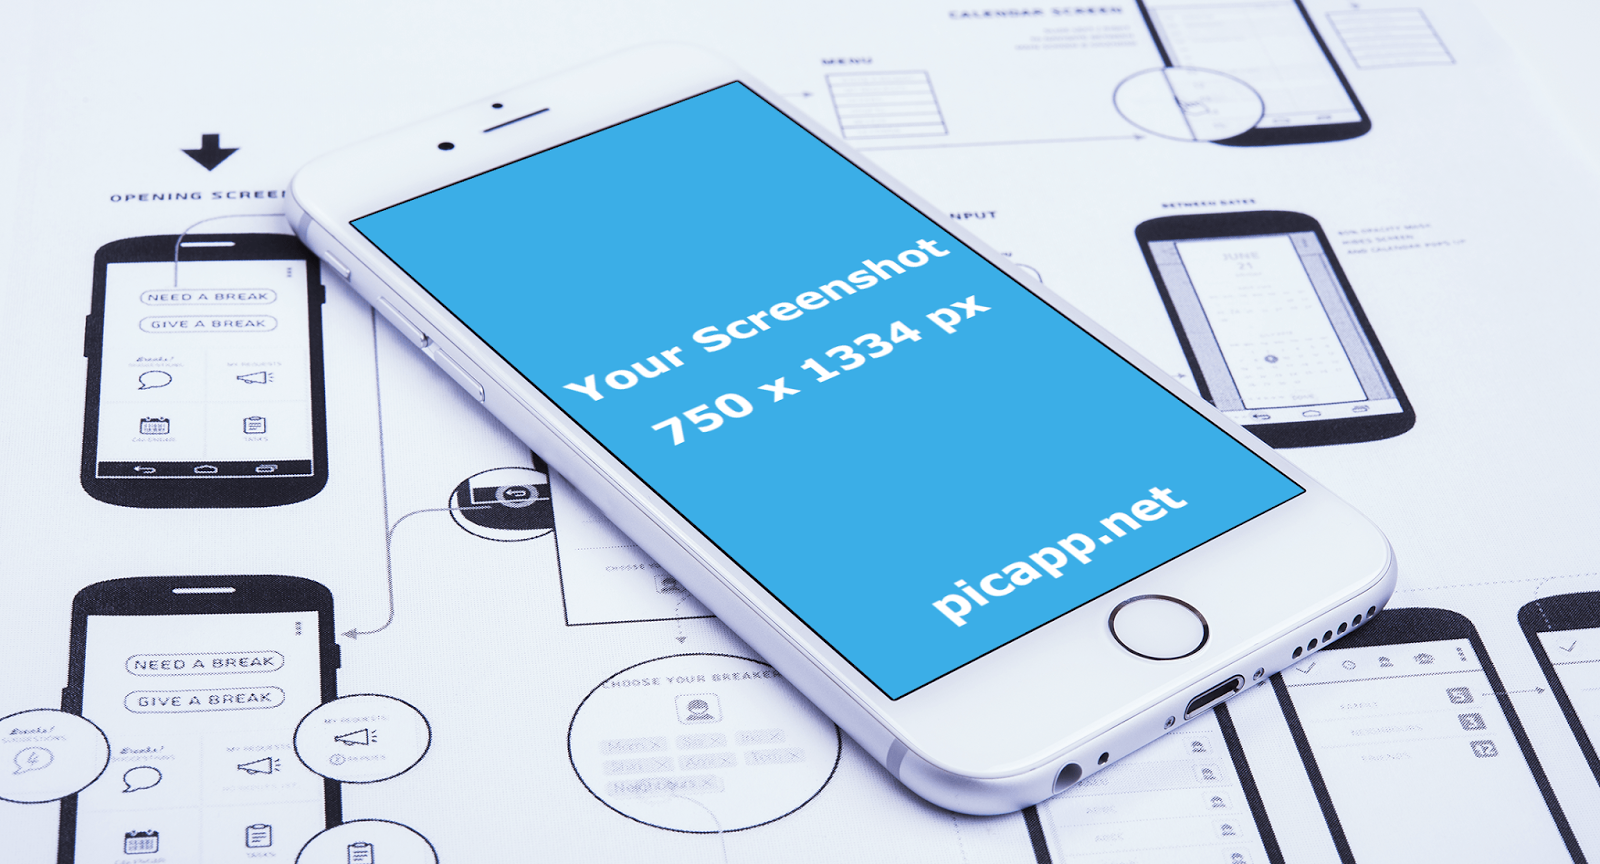
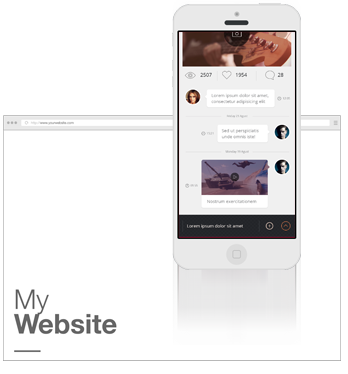
In this tutorial you will learn how to add a screenshot to a smartphone phone frame.
Some notes before we start:
These steps are valid also for other frames (smartphones, tablets, computers or wearable devices).
We chose a frame image which is rotated for this tutorial, in order to cover more scenarios.
At the end of the page we provide an alternative no-Photoshop solution to place your app screenshot inside a device frame with just one click.
Let's get started !
1 Step 1
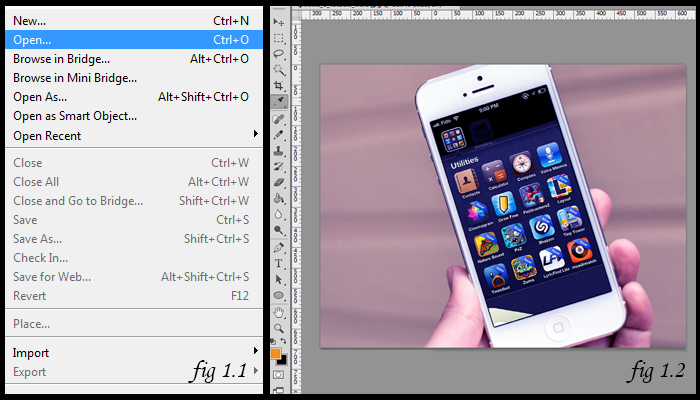
Open your Adobe Photoshop CS6. From the top menu, select File then go to Open. Choose your phone frame and click on Ok or hit Return.
2 Step 2
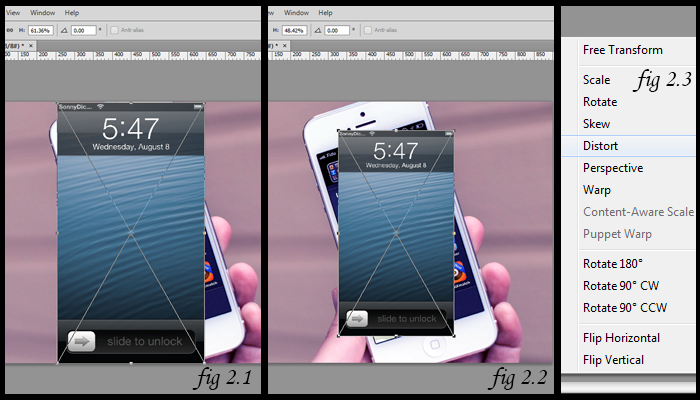
Use your explorer (My Computer, Finder etc) to navigate to the location of your screenshot. Drag and drop it in Photoshop, in the center of the frame. You should obtain a similar result like we did in fig. 2.1. Grab a corner, hold Shift and drag with your mouse in order to make the screenshot smaller. You can also move the image around to position it. The objective is to see all 4 corners of the phone frame, like in fig 2.2. Next, right click on the screenshot and choose 'Distort'.
3 Step 3
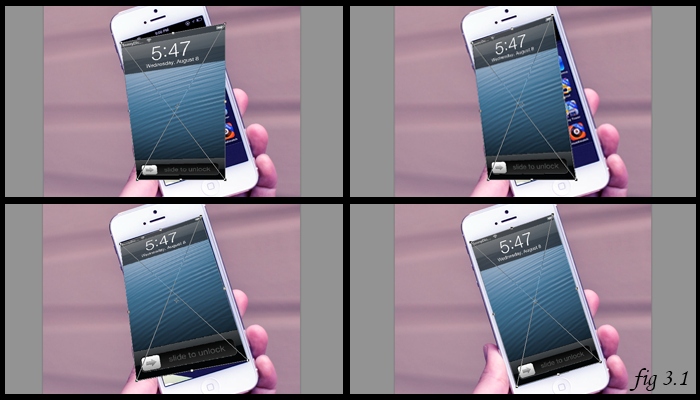
All you have to do now is click & hold on each corner individually and place it in its position. The fig 3.1 shows how the transformation should look at each step. After you're done, hit Return.
4 Step 4
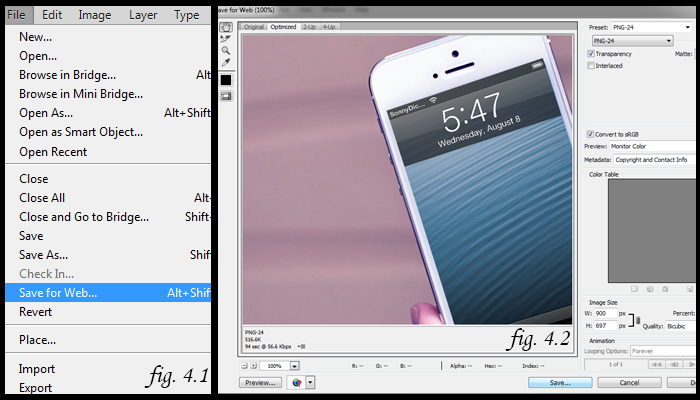
Now it's time to save your image. Go to File and choose 'Save for Web...' Select what type you image you want (JPG, PNG or GIF) and click on Save. Choose the location and you're done. Fig 4.1 shows how you should do.
! No-Photoshop Alternative
You can easily place your screenshot to a mobile device or computer frame with just one click using PicApp.net.
We've just added 2 new iPhone frames to our frame gallery: iPhone 6 in black and white.
We are working now on the iPhone 6 Plus frames, together with some other cool, more artistic, iPhone frames. If you want to be informed every time we add a new frame to our gallery, follow our Facebook Page.
2 Glowing hotspot
The hotspot can glow now, like in the demo above. In the hotspot's properties, you can configure how often should the hotspot glow (e.g. every 2 seconds). You do this using the "Glow Interval" slider (as showed in the screenshot on the left). By default, all hotspots are set to 0, which means "no glow". Apart from glowing, you can configure the colour of the hotspot and you can make it appear with a defined delay.
3 Animated GIF files
You can now add animated GIF files to your demo, using the "Add Image" control available on each screen. This is very useful if you want to add animated annotations, arrows, loading effects (like the one on the right) to your demo.
You can now change the demo frame by clicking the button "Change Frame" on "My Demos" page. With this new functionality we deprecated the "Copy with new frame" option. This functionality allows you to easily switch betweens white and black frames and to upgrade to a newer device frame (e.g. from iPhone 5 to iPhone 6). If you want to be informed every time we add a new frame to our gallery, follow our Facebook Page.
2 Save object properties
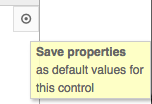
You can now save your favourite properties for an object (such as colour, text font and size, etc.) by clicking the button located in the top-right side in the object properties view (see the image on the left). This is a great feature if you want to make your annotations and arrows follow some design guidelines. For example, if you like your arrows to be blue and curved, just configure an arrow like this, press the "Save properties" button and all following arrows you will add in your demo will look like this one. This works even across demos.
3 Revision history
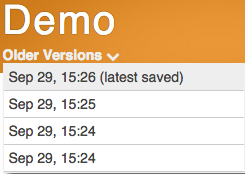
We enabled demo versioning, so you can now access the old versions of a demo while in the demo edit mode. You can navigate through the screens of an older version, preview it, but cannot edit it. Of course, if the older version is better than the current one, you can revert to this version by clicking the "Restore this version" button.
4 Better demo previews
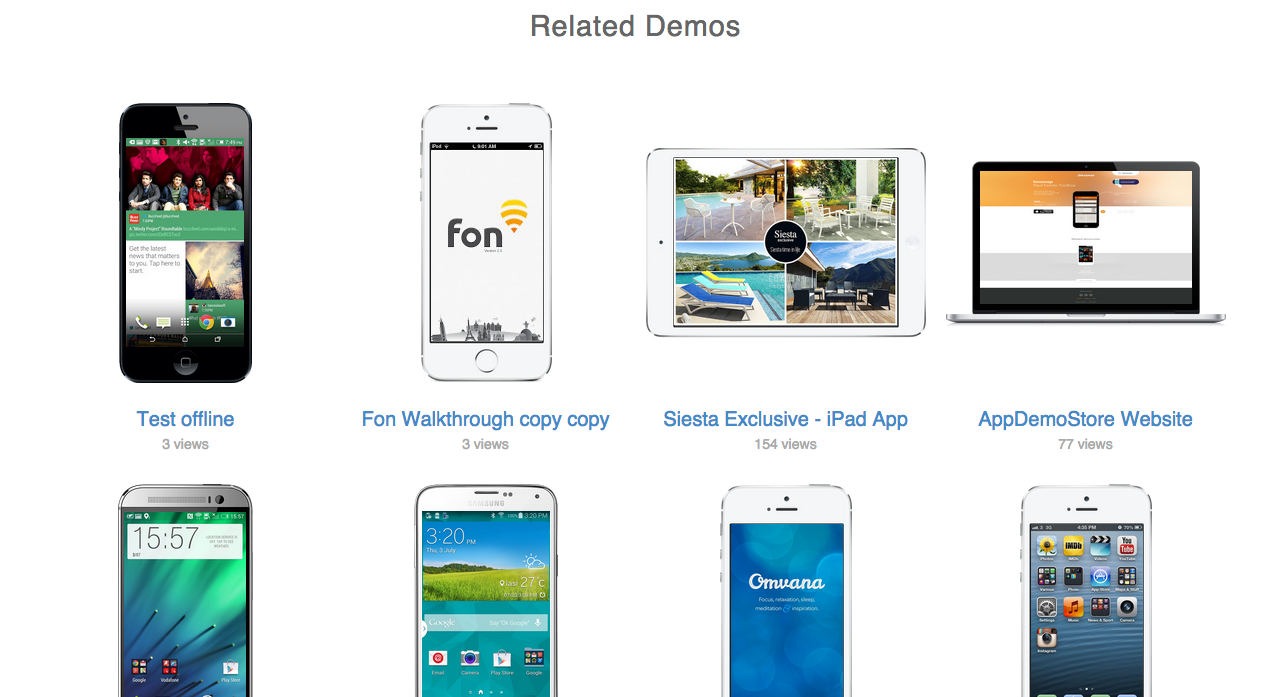
We improved the look of the "Related demos" section on the Demo Page. All thumbnails have now the frame included, so that your demos look sexier. The "Related demos" section includes all your public demos. Private and protected demos will not be listed here.
You can now add a time delay to an object, which allows you to make your object appear only after a specified number of seconds. For example, if you want an arrow to appear only after 5 seconds on a screen, just set up the property "Delay" of the object "Arrow" to 5 seconds. Have a look at the demo on the right - all the arrows in the demo appear with some delay.
2 Multiple Copy&Paste
You can now copy multiple objects and paste them on other screens of your demo. This is a great feature when you need to copy multiple hotspots that create the app navigation menu.
3 Better Arrows
You can now configure the arrows easier by using the new properties: "Curvature" and "Rotation". The "Curvature" defines the degree to which the arrow is curved. If you want a straight arrow, just set the "Curvature" to 0. The "Rotation" defines the angle to which the arrow is rotated. Moreover, you can now introduce your exact values for all the properties in the input fields next to each property slider.
If you’re looking to gain weight, lose weight, or just to keep a close eye on the amount of calories you’re eating every day, a fitness application for your Android device is a must. Below you can find 3 of the most popular and efficient fitness apps: S Health, Virtuagym and MyFitnessPal.
To get an idea how these apps look feel, click through their demos - all areas marked with orange are clickable.
1 S Health
This application comes preinstalled on the Samsung Galaxy S4 and S5. It is helpful especially if you want to lose weight or to maintain your actual condition.
You have the possibility to add certain types of food to your diary, count how many steps you take in a running or walking session or you can see how many calories you burn during an everyday activity like football or volley. In addition to that, you can keep track of your blood glucose & blood pressure.
What is special about S Health is that you can monitor your hearth rate by attaching an appropriate medical device to your phone.
Virtua Gym focuses more on the muscle development. It is suitable for bodybuilders or for those who want to gain weight fast.
You can track your weight, heart rate when exercising or resting, body fat percentage and a lot more. The most interesting thing is that you can choose from a huge variety of exercises and most of them come with an animation which allows you to see exactly what you have to do. Built-in workouts are also featured, starting with novice level trainings and finishing with expert sessions.
We could say that MyFitnessPal is like a combination between S Health and Virtua Gym, but with less features. It allows you to set your goals, including losing weight, gaining weight or maintaining your current condition.
A cool feature is that you can add products to your diary by scanning the bar code. You can search in the database for particular exercises, such as pushups, but there won’t be an animation showing you how to do it.
An extra feature is that you can have friends inside the application and you even have a small ‘news feed’ where you can see what are your friends doing.
Considering the success of our previous Android Simulator, Android 2.3 Gingerbread, we created a similar simulation of the new Android 4.4 OS. Like the previous one, this is an online simulator that runs in the browser - it is perfect if you want to rapidly try out the UI, design and some key functionalities of Samsung Galaxy S4 running Android KitKat, without going to the shop or installing the Android Emulator.
The skin used in this simulator belongs to Samsung Galaxy S4 and it has a 5” display and a 1920 x 1080 screen resolution. Among the simulated features you can find: Google Search, Google Earth, Trip Advisor, Clock, Contacts & Messaging.
Besides that you can also notice the visual differences between Android 4.3 and Android 4.4, like the color of the status bar elements.
If you liked it and found it helpful, feel free to share it.
This article explains how to view your demos without an internet connection on iPhone, iPad and Android phones & tablets.
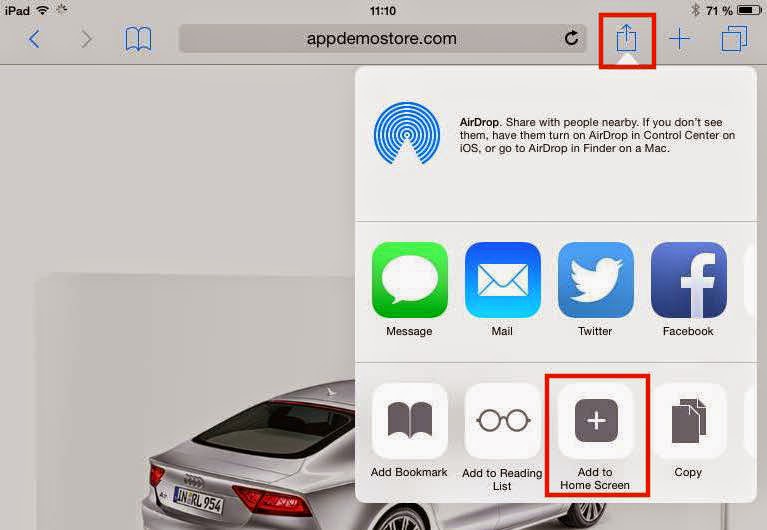
1 Add your demo to the device Home Screen
Access your demo on your mobile device and add it to the Home Screen. See details on how to do this here.
You'll then have an icon on the mobile device home screen which you can use to launch your demo like a regular app.
2 Run demo online first
First you have to run your demo in online mode to allow the browser to cache all images and demo components.
If you've created the demo with an AppDemoStore PRO account your demo will automatically be cached by the mobile device browser.
3 Run demo offline
Once the demo has been cached it will be available offline also. As already mentioned, you need an AppDemoStore PRO account for this to work.
A final note: this functionality uses HTML5 application caching, which lets web-based applications run offline. So your browser needs to support application caching (latest versions of iOS and Android do) and to have enough internal memory to store all demo images.
This blog explains how to embed your clickable demo, tutorial or simulation created on AppDemoStore.com in a pop-up panel, like in the sample on the right-hand side (click on the image to open the demo). You can easily create such an image from App Screenshot + Device Frame, with one click with our PicApp Tool.
New to AppDemoStore? Click here to learn how to create a click-through demo or tutorial for your mobile app in minutes and for free.
You can easily open your demo in a pop-up by using a bit of Javascript coding, as described below.
1 Insert the following Javascript code into your webpage
var showPopup = function(url) {

 // create transparent background
 var elBackground = document.createElement('div');
 elBackground.setAttribute('style', 'position: fixed; top:0; left:0; width:100%; height:100%; background-color:rgba(0,0,0,0.8); z-index:1000; cursor:pointer');
 elBackground.onclick = function() {
  fClose();
 };
 document.body.appendChild(elBackground);

 // create iframe to load the demo page
 var elFrame = document.createElement('iframe');
 elFrame.src = url;
 elFrame.setAttribute('style', 'position:relative; top:5%; left:30%; width:40%; height:90%; border:none;');
 elBackground.appendChild(elFrame);

 // create elment to close the popup
 var elClose = document.createElement('div');
 elClose.innerHTML = 'X';
 elClose.setAttribute('style', 'position:absolute; top:0; right:0; margin:10px; cursor:pointer');
 elBackground.appendChild(elClose);
 elClose.onclick = fClose;

 // function to close the popup
 var fClose = function() {
  document.body.removeChild(elBackground);
 };

};
2 Use the function created in step 1 as shown below
Add an image or a button to your web page and add the following code to the onclick event (adjust
the link below to point to your own demo, by replacing the ID):
This guide is valid only for PowerPoint on Windows
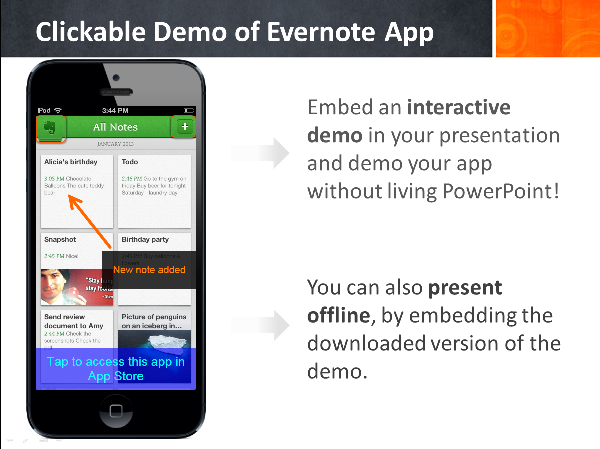
An AppDemoStore demo is just a web page. So, to be able to embed a demo into PowerPoint we have to figure out how to embed a web page into PowerPoint. PowerPoint does not provide direct support for inserting web pages (as it does for images for example), but we can use a very simple macro to do the job.
There are also a few add-ins available online which let you insert a web page into a PowerPoint. But the main disadvantage of this approach is that if you send the presentation to other people they have to install the add-in also.
We will use the Microsoft Web Browser control and a one-line macro script.
We are using Microsoft PowerPoint 2010 in this, but the process is similar for other PowerPoint versions.
1 Add the Developer tab
In order to be able to add the Microsoft Web Browser control which will load our demo web page, we have to add the Developer tab to the PowerPoint presentation.
By default, this tab is not visible, but we can add it to the toolbar like this:
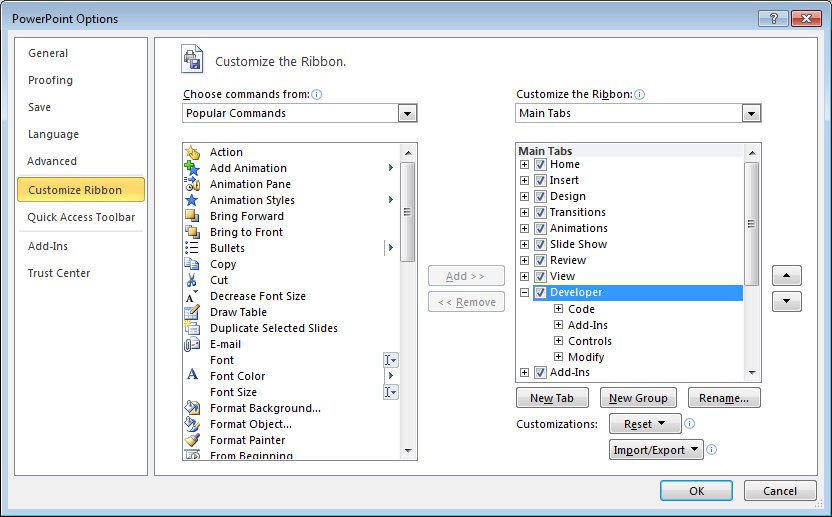
In the menu go to: File -> Options.
Go to Customize Ribbon and in the Main Tabs section select the Developer tab.
2 Add the Microsoft Web Browser control
The Microsoft Web Browser control is basically an Internet Explorer web browser which can be embedded into PowerPoint slides. We'll use it to load our demo web page.
Here is how to add the browser control to a slide:
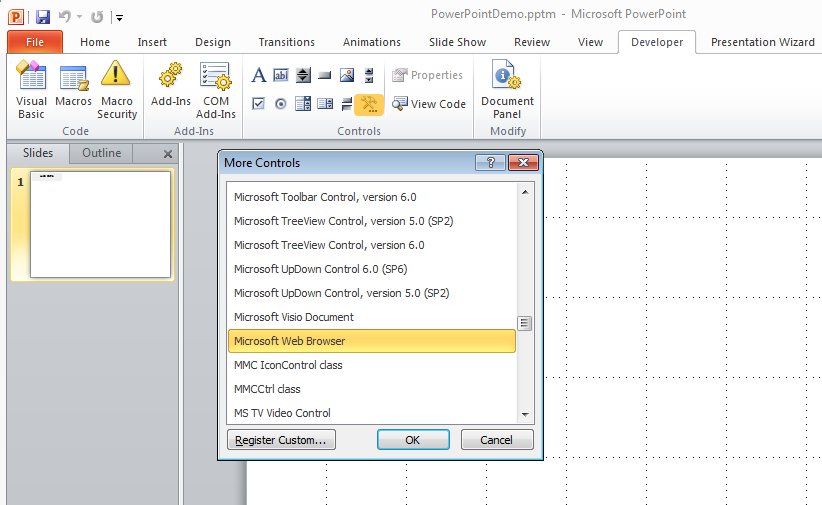
Go to the Developer tab click the button More Controls.
Select Microsoft Web Browser.
Drag a big area on your slide to have enough space to see the demo properly.
3 Add a CommandButton control to load the demo
We'll use a CommandButton control to trigger the loading of the demo web page:
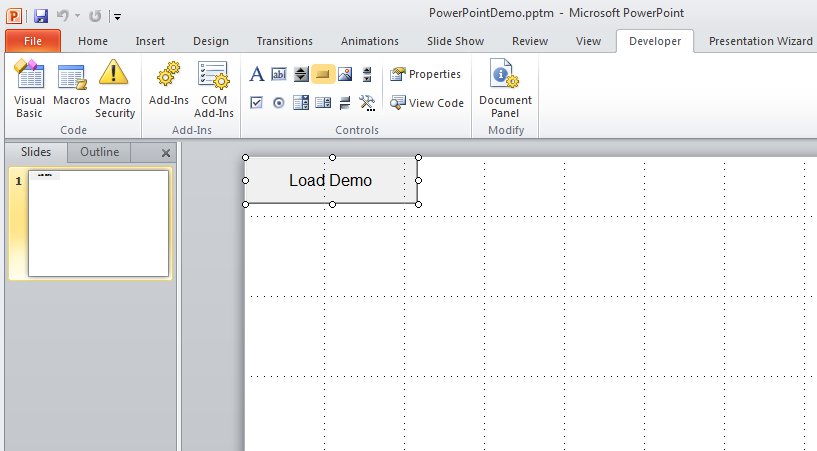
Go to the Developer tab and click the button Command Button.
Right-click on the button you have just added to the slide, click Properties and for the Caption property type "Load Demo".
Double-click the button to add the macro code in Visual Basic.
4 Add Macro Script
Type the following line of code to be executed when you click the button (make sure you're typing in the CommandButton1_Click function):
You can also load a downloaded demo file if you wish (for offline scenarios for example). In this case you have to load the demo HTML file from the specific location on your computer:
Now when you're in Slide Show mode and click the Load Demo button, the demo will load into the Web Browser control and you'll be able to click through it without leaving your PowerPoint presentation.
This guide explains how to add scrolling screens to your interactive app demo. You can scroll the entire screen (like in the demo on the right-hand side), or scroll only a part of the screen (like in the demo at the end of this article).
1 Create a long image to use for the scrolling area, by merging several screenshots
This is how you create such an image:
Take several screenshots of the scrolling area.
Merge the images with a graphic tool such as Paint (Windows) or Preview (Mac).
Save the big image and upload it as the background image of a demo screen (as described in step 2).
Need more help with the merging process? This article explains in detail how to merge images with Paint on Windows and this article explains it with Photoshop.
2 Add this image to your demo
Upload the long image created in Step 1 as the Background Image of a screen. To do so, add a new screen to your demo and select "Upload Screenshots". To edit an old screen, select it and use the button Upload Image (as showed in the image below) - this will replace the old background image with the new one, while keeping all controls in place.
Set the screen's property Image Layout to scroll.
Use the 2 properties Fixed Header and Fixed Footer to define the fixed areas (the ones that shouldn't scroll). As you adjust the 2 properties you see the blue lines moving on top of your screen.
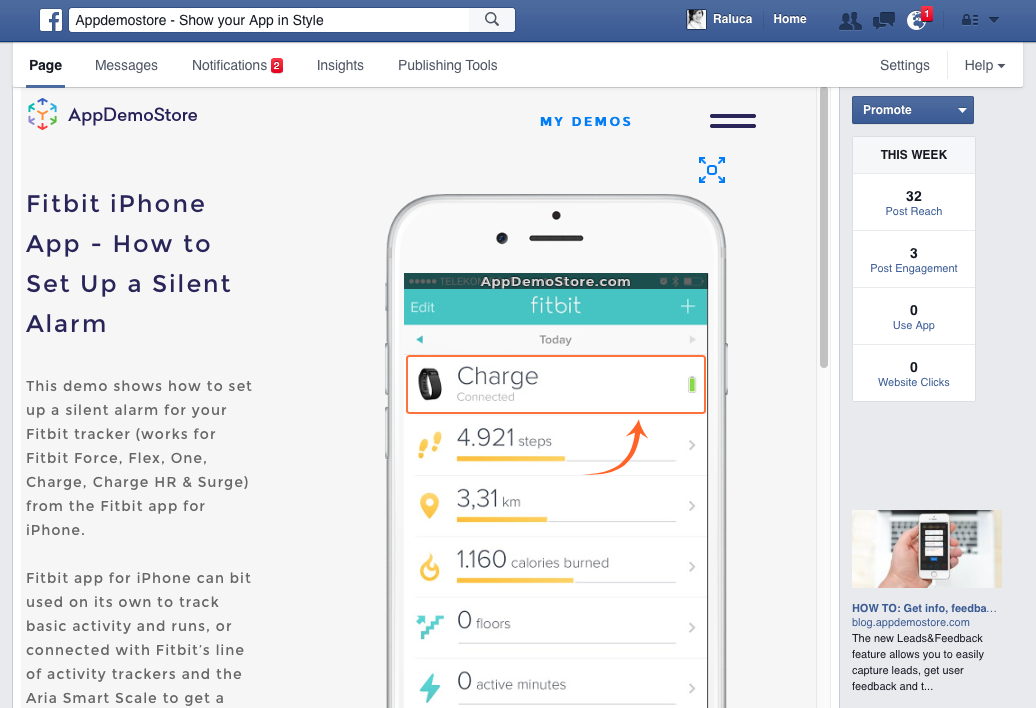
Some of the advantages of including an interactive demo of your app in your Facebook page are:
your friends can experience your app right on Facebook
the demo is easy to share and spread it virally
you get Facebook-related statistics
How it works
1Add the "Static HTML Iframe Tab" App to your Facebook Page
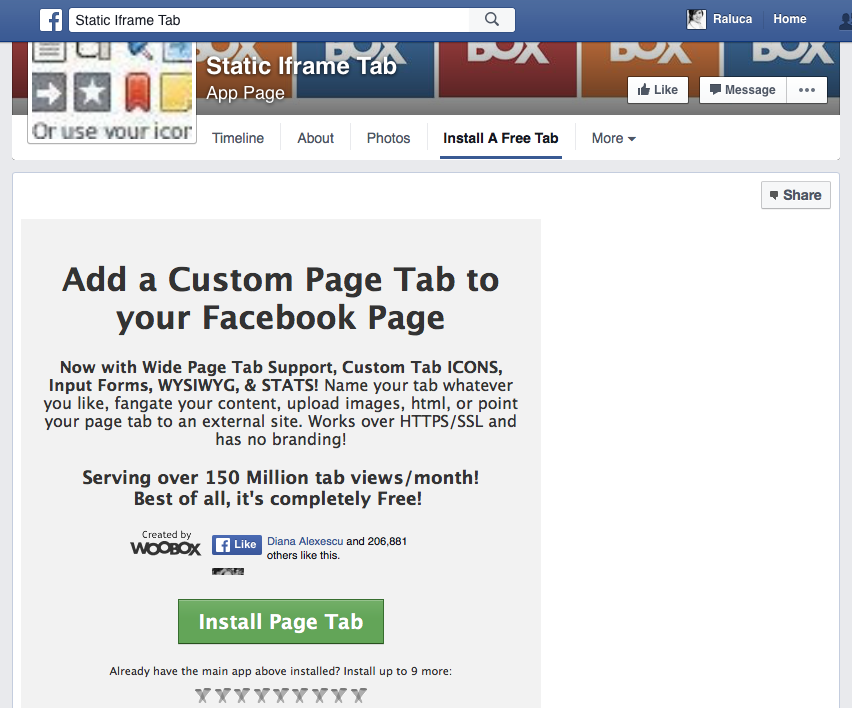
The only way to add HTML code to Facebook is by using an app - there are several apps for this, we choose the Static HTML Iframe by Woobox. Here are the steps to add this app to your Facebook Page:
Log in to Facebook with the user that has admin rights for the page you want to add the demo to
Search for Static HTML Iframe Tab by Woobox or access it directly via this link
Add the app to your page by clicking the button Install Page Tab, then Add Page Tab (if you manage more pages, make sure you select the right page first).
2Embed the demo and customize the tab
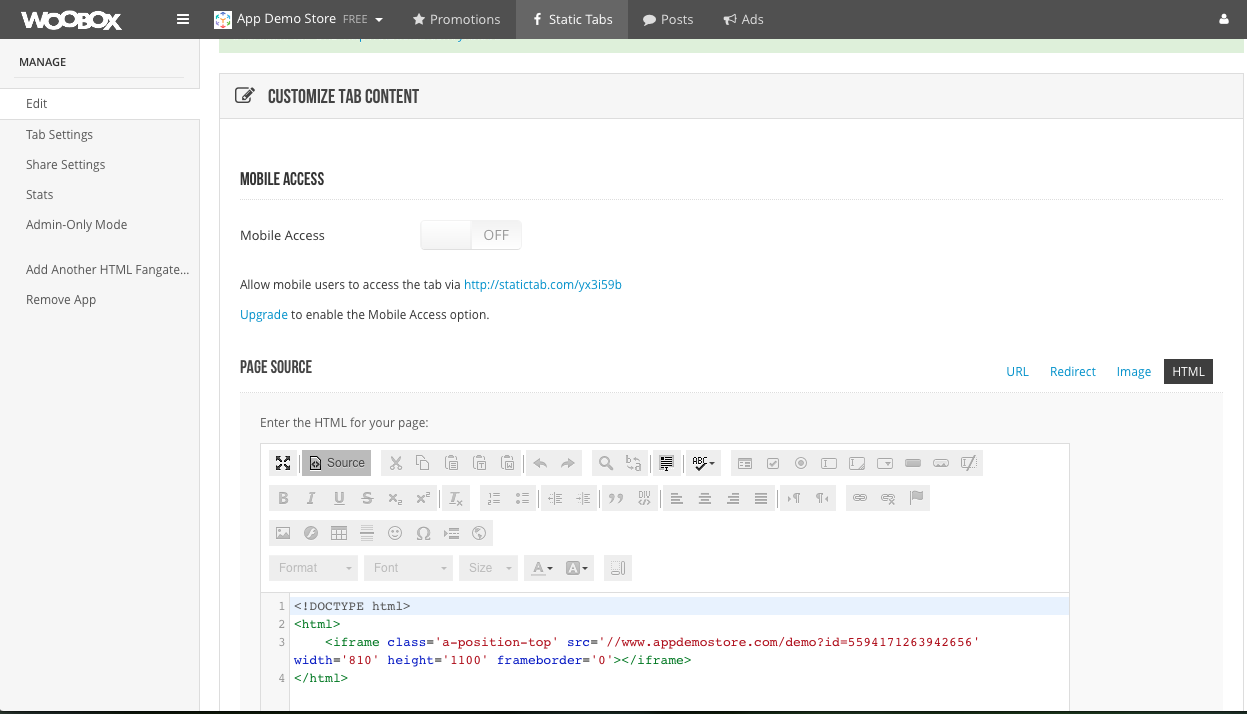
The app will create a new tab called Welcome in your Facebook Page. We will embed the demo in this tab. To be able to edit the tab, you need to authorize the app by clicking the button Authorize the Tab Application. The tab will open in edit-mode which looks like in this screenshot.
Here's what you have to do here:
Give a meaningful name to the tab (e.g. Our App Demo, Test our App Online, etc.) and upload an image for it (e.g. an app screenshot)
Go to your demo page on AppDemoStore.com, copy the code provided in the Share section on the Demo Page and paste it in the HTML section. Please replace the http with https in the URL
You can also customize who can view this tab and how the share will look like
This step-by-step guide explains how to record a video of your app demo. The prerequisite is that you have your app demo created on AppDemoStore.com platform (please see step 1).
It's really easy, you can do it with completely free tools and the result is a high quality HD video of your app which can be uploaded to YouTube.
Here are the steps we're going to go through:
Prepare your mobile app demo
Prepare for HD video recording
Record the video
1 Prepare your mobile app demo
For the purpose of this tutorial, we created a demo of the Evernote iPhone app. You can have a look at the demo on the right hand side. Click through the demo to see how the app works. We've created this using a few screenshots of the app and then defining the navigation and screen transition effects.
You should have a similar demo for your own app. You can easily create it on AppDemoStore.com. Here's a short guide to help you create a demo: How to create an interactive app demo. It should not take you more than 5 min for a simple demo.
Also make sure you define a meaningful end-to-end navigation scenario and you configure the UI effects and screen transitions to resemble those of your mobile app.
To get a realistic video recording you should consider customizing a few things:
Go to Demo Edit > Interaction and disable the highlight property for hotspots
Go to Demo Edit > Settings and disable the AppDemoStore toolbar). Also, you could replace the white hand with the default one.
2 Prepare for HD video recording
In order to get a high quality HD movie we need to record the demo in a big enough size. A 720p HD movie means a resolution of 1280x720, so we'll have to make sure we play our demo in a browser window of this size or bigger (more info on Wikipedia on 720p video ).
In order to get the desired demo size we'll have to use the full screen functionality. On the demo page press the full screen button to run the demo in the entire browser window. Also make sure your browser window is maximized.
The last thing you need to do in this step is to go through the demo once just to make sure you remember where to click when you record the video and also to make sure all app screenshots are loaded and cached so they won't have to be loaded during the recording
3 Record the video
For video recording you can use your favorite screen recording application. If you don't have one already we recommend the excellent BB FlashBack Express screen recording tool. It's really easy to use, it's free and in case you need more features you can buy the Pro version.
OK, now just run BBFlashBack Recorder (or your own screen recorder) and choose to record a region of your screen. Drag the red rectangle to include your entire demo and hit the Record button. When you finish recording your video BBFlashBack Recorder saves the recording in a file which you can open with BBFlashBack Player:
Now in order to save your video press the Export button on the toolbar and choose to export the video as AVI.
The next step is very important because, depending on how you choose to encode your video, meaning the codec you use, the quality of the outcome can be very different. To get a good quality to file size ratio you can select the DivX codec for example, then click Configure and choose the 720HD profile. You might have other codecs installed on your computer (the Xvid is another good codec) - you can experiment and try to see which codec gives you the best video quality for a reasonable file size.
Once you export the video with these settings you get an avi file which you can embed into your web site or upload on YouTube.
How to share the video on YouTube
For this tutorial we have uploaded our video on YouTube and then embedded it in this blog below. You can adapt the embedding code you get from YouTube to better match the format of your demo - for example for our vertical demo we changed the width and height values to better fit the vertical iPhone frame:
One more tip: You need high quality video, preferably HD, to show mobile app demos - otherwise the app UI elements (like text, buttons, etc.) would appear blurry. YouTube automatically adjusts the video quality depending on the size of the video. So make sure that, when you embed the video, you give big enough values to the width and height attributes - larger values will get you a betetr quality video. You can also change the video playback quality using the little wheel-like button on the YouTube video control bar.
PicApp.net is a smart tool that will add a mobile device frame (iPhone, iPad, HTC One M8, LG G3, Apple Watch, Samsung Galaxy, and many more) to your app screenshot in seconds.
You can select between 150+ high-quality device frames with transparent background. If you're looking for a more artistic photo, with background, you can upload your favourite image and place your app screenshot inside it with a couple of clicks - have a look at the video below to see how easy this is!
You need NO design or technical skills, installs and sign ups.
Privacy Note
The image processing takes place in your browser, which means that your image never leaves your side - this is a great feature for private images that you don't want to upload in the cloud.
How it works
1 Upload your app screenshot
Access PicApp.net in a modern browser such as Google Chrome, Firefox and Opera and upload your app screenshot. You can upload even private shots, because images are not stored anywhere besides your own browser.
2 Select your favorite device image
Select the image that best suits your app from the 150+ images. If you don't find a suitable image in our gallery, you can upload your own image or choose one from our Pinterest Collection of Free Mobile Devices Images. The video above shows how easy it is to place your app screenshot inside your favorite image.
3 Download image as PNG
Download the final customized image as PNG and use it to show your app in style. All images from our gallery have perfectly rounded corners and transparent backgrounds, so that they look good on any background.
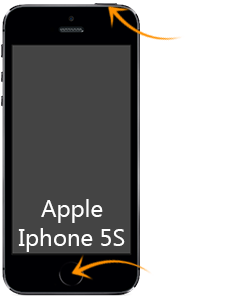
Press the HOME BUTTON and the LOCK BUTTON at the same time.
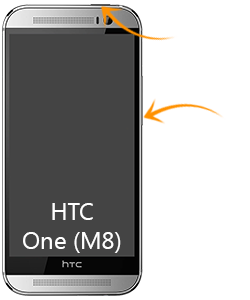
HTC One
Press and hold POWER and VOLUME DOWN at the same time.
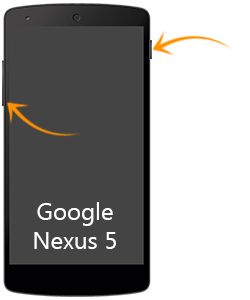
Google Nexus
Press and hold the POWER and the VOLUME DOWN buttons at the same time.
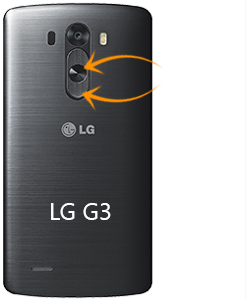
LG G
1 Hold down the VOLUME DOWN and POWER BUTTON and the same time. 2 Hold down with your finger on the bar with the software keys; swipe up and to the right and select the Q MEMO + option.
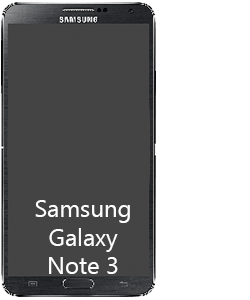
Samsung Galaxy Note
1 You can capture a screenshot by touching the screen with the side of your hand and swiping across from left to right, or vice versa. 2 Press and hold the S PEN BUTTON; place the tip of the S PEN anywhere on the screen and hold it for about a second.
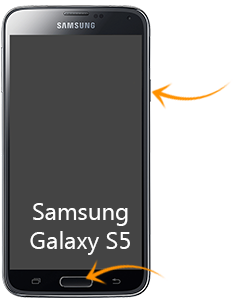
Samsung Galaxy
1 Simultaneously press the POWER BUTTON and the HOME BUTTON. 2 Capture the screen by swiping the edge of your hand across it, from side to side, keeping in contact with the screen. i For S4 and S5: Make sure that the 'Palm Motion' feature is activated.
Need to easily add a device frame around your screenshot?
Use our free FrameApp tool to do this with one click.
The process is very similar to embedding a YouTube video into your website. Here are the 2 easy steps:
1Get the HTML code from demo page
On the demo page click
The Share Overlay will open, which gives you different options to use your demo (share over URL or social media, embed, download, install on mobile, etc). Select the option
Select one of the 3 predefined sizes for the demo and copy the code provided in the field HTML code.
2Paste the HTML code in your website
Paste the HTML code in your website. You can manually adjust the size of the demo by giving your own values for the attributes width and height.
When embedded in your website, the demo will not load all screenshots at once and thus making your page slower, but will load only the first image and those linked from it.
To make your demo available offline, download it and embed the downloaded version to your website.
Having developed and published a great Android App is not enough. If you want to sell it to a lot of people and earn good money, you will have to promote it. Blogging, tweeting, Facebook-ing, emailing, etc. are a great way to spread the word. But how do you differentiate your app in the big pool of great apps? A simple yet effective way to do this is to include an interactive demo in your posts and articles, so that people can experience your app, see how it works and "connect" to it. This way, they are more likely to buy your app.
This guide shows you how to create an online interactive demo of your Android app - like the one you see on the right-hand side - in just a couple of minutes, for free. Your demo will be interactive, guided, online, easy to embed in your website or blog, and will run in the browser or on an Android device. So, the perfect tool to promote your app!
1Make up your mind about the scenario you want to demo
One of the best selling scenario is showing your potential users how your app solves one of their problems.
2Take screenshots of this scenario, screen by screen
The easiest way to take screenshots of your Android app is directly from the Android Emulator. However, you can take screenshots also from your phone, but the method will work only on some phones. If you have a Samsung Galaxy, you can capture a screen by pressing and holding the Back button and then pressing the Home button. Your screenshots will then appear in the Gallery, in a separate folder called ScreenCapture. When done, send the screenshots to your PC.
3Sign up to AppDemoStore.com
You can sign in from your desktop or mobile device (no credit card details needed). Once signed in, you will be directed to "My Demos" page.
4Create a new demo and Upload your screenshots to it
In the section "My Demos", click the "Create Demo" button. Select a frame from the gallery (the latest Google Nexus, Samsung Galaxy & HTM frames are always available). The frame will be visible when the demo is viewed on a computer and not visible when viewed on a mobile device. The frame can be changed later.
Upload your screenshots to your demo by clicking the button "Upload Screenshots" and selecting the files from your disk. Multiple file upload is possible, but you can upload a maximum of 10 screenshots at once. To upload more screenshots, just use the button "Upload Screenshots" several times.
Scrollable Screens: To create scrollable screens, just upload a long image and then set its property "Image Layout" to "scroll". More details here.
5Add interaction, animations and annotations.
Use the "Hotspot" control to add interaction between your screenshots. You can choose the transition effect between screens (slide up/down, fade). More details here.
Use the "Textbox", "Callout" and "Link" controls to add annotations, explanations, auto-typing and links.
Use the "Timer" control to simulate loading effects or show a screen for a limited time (e.g. splash screen).
Use the "Arrow" control to add customizable arrows. More details here.
Use the "iFrame" control to embed webpages in your demo.
Use the "Image" control to add small images on top of the screenshots.
Use the "Video" control to embed a YouTube video or a video stored on a server. More details here.
Use the "Sound" control to upload audio files or provide a text to be spoken with our Text-to-Speech functionality. More details here.
Use the "User Input" control to let users type information into a field that is carried over to the next screens. More details here.
The demo is HTML-based, thus runs in any desktop or mobile browser.
Common use cases for using your demo
Share the link to your demo via Email or social networks.
Embed demo in your website or HTML email.
Embed the demo into your Facebook Page. Learn how to do this here.
Embed demo in your app. Learn how to do this here.
Download your demo as an HTML, ZIP or APK or PDF.
Capture leads and feedback with your demo.
Get in-depth demo analytics such as where did user click, interaction flow, exit screens, etc. More details here.
Use it as a starting point for generating a demo video for your app. More details here.
If you thought about installing the new Android 2.3 Gingerbread Emulator just to see how the latest mobile OS from Google looks like you can save some time.
Here is a simulation of some of the functionality of Android 2.3 (Gingerbread) mobile operating system.
The demo is based on the Android Emulator running an android virtual device with Google API level 9, WQVGA400 resolution and LCD density of 160.
The skin is the Google Nexus S phone. Simulated features: web browser with Google search, Google Email, Google Maps, alarm clock, contacts.
The simulator is based on the Android Emulator running an android virtual device with Google API level 8 and the skin is the Google Nexus One phone.
Among the simulated features are: web browser with Google search, Google Email, Google Maps, alarm clock, contacts, image gallery.
You can access the simulator on AppDemoStore.com
here.
Or you can click-through the simulation right in this page: