Quick intro
This guide explains how to use the Hotspot control to add interactivity to your app demo, such as:
- simulating tappable buttons
- defining clickable areas
- explaining multi-touch gestures
Click through the interactive presentation on the right-hand side to see some use cases for the Hotspot.
How it works
1 Add a Hotspot to any screen in your demo
To do so, click the Hotspot icon in the Controls Toolbar while on the screen where you want to add it. The role of the Hotspot is to direct the demo users to another screen in the demo.
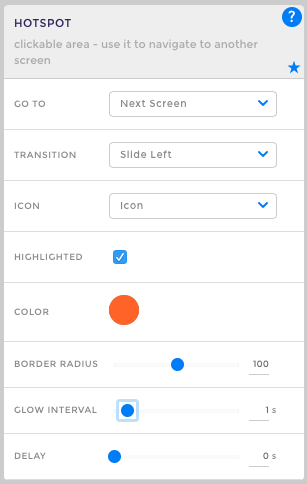
By-default, a Hotspot will send the user to the next screen in the demo, but you can easily change this with the property Go to (in the Properties Toolbar on the right-hand side of the demo editor). You can send the user to a certain screen in the demo or to the next/previous screen or Back, which works like the the browser's Back.

2 Customise the Hotspot's look using its properties
- TRANSITION: choose between a couple of mobile-specific transition effects such as slide up/down/right/left (demo screen 2)
- ICON: choose an icon for your Hotspot, such as tap, pinch, slide, etc
- HIGHLIGHTED: select this if you want no border
- COLOR: customise the color of the Hotspot border or make it transparent
- RADIUS: easily change the radius of the Hotspot border from square to round
- GLOW INTERVAL: make the hotspot glow faster or slower; 0 means no glow
- DELAY: delay the appearance of the Hotspot on the screen
- SAVE PROPERTIES: save the properties of the selected Hotspot as the default ones by clicking on the small gray star in the Properties Header