April 18, 2017

How to Create a Click-through Guide for Your App

A click-through guide for a mobile app has the role to reveal the key functionality of that app to users and show them how to use it.

Some will argue that people should be able to figure out how an app works intuitively, just by looking at it, but click-through guides are becoming an increasingly popular marketing strategy as apps become more complex. In the same time, even in the case of relatively simple apps, users can benefit immensely from the ability to experience a straightforward interactive guide of an app right their browser, without the need to install it on their mobile device.

Mobile app developers are well aware of the importance of a landing page for app marketing. Including a click-through guide in your app web site or landing page is really easy and your users are going to be grateful.

This article explains how to create an interactive click-through guide like the one for the Evernote app embedded in this page.


1 Define the scenario you want to show

You can either show an overview of a few key features of your app or go for a specific use case showing users how to perform one particular task using the app.


2 Take screenshots

A click-through guide which shows people how to use your app needs to be as realistic as possible. So we'll use screenshots taken directly from apps running on mobile devices. As an alternative, you can also use app images generated from your design tool.

On iPhone and iPad, when you are on a screen that you want to capture, press and hold the Home button and then press the Power/Sleep button. Your screenshots will then appear in the Photo Gallery app. To find out how to take screenshots on other devices check this article.


3 Sign up to www.AppDemoStore.com

You can try our service at AppDemoStore for free - so go on an create an account.

You can sign in from your desktop or mobile device. Once signed in, you will be directed to "My Demos" page.


4 Create a new demo and upload your screenshots

On My Demos page, click the Create Demo button. Select a device frame from the gallery (you can choose from a variety of iPhone, iPad and Android phones and tablets). The frame will be visible when the demo is viewed on a computer and will be hidden when viewed on a mobile device. The frame can be changed later.

Upload your screenshots to by clicking the Upload Screenshots button and selecting the image files from your disk.

Scrollable Screens: To create scrollable screens, just upload a long image and then set its property "Image Layout" to "scroll". More details here.


5 Add interaction, animations and annotations.
Now it's time to bring the still images to life and make your guide clickable and interactive.
  • Use the Hotspot control to add interaction between your screenshots. You can choose the transition effect between screens (slide up/down, fade). More details here.
  • Use the Textbox, Callout and Link controls to add annotations, explanations, auto-typing and links.
  • Use the Timer control to simulate loading effects or show a screen for a limited time (e.g. splash screen).
  • Use the Arrow control to add customizable arrows. More details here.
  • Use the iFrame control to embed webpages in your demo.
  • Use the Image control to add small images on top of the screenshots.
  • Use the Video control to embed a YouTube video or a video stored on a server. More details here.
  • Use the Sound control to upload audio files or provide a text to be spoken with our Text-to-Speech functionality. More details here.
  • Use the User Input control to let users type information into a field that is carried over to the next screens. More details here.
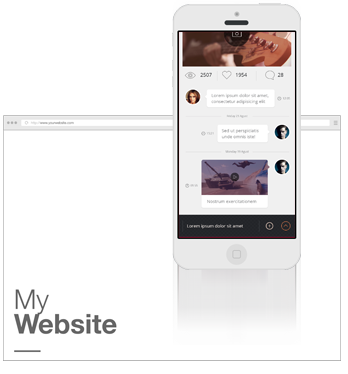
The guide you've just created is HTML-based, so it runs in any modern desktop or mobile browser.

Common use cases for using your click-through guide
  • Share the link to your guide via Email or social networks.
  • Embed the guide into your website or app landing page.
  • Embed the guide into your Facebook Page. Learn how to do this here.
  • Embed the guide in your app. Learn how to do this here.
  • Download your guide as an HTML, ZIP or APK or PDF.
  • Capture leads and feedback with your guide.
  • Get in-depth analytics such as where did user click, interaction flow, exit screens, etc. More details here.
  • Use it as a starting point for generating an video guide for your app. More details here.

May 10, 2016

HOW TO: Create a Demo or Tutorial of your Apple TV App

Spread the word

Starting this week, you can create demos of your OS TV app on AppDemoStore platform. Demos are a great way to promote your app or show how it works - especially for apps that are not free. It is a fact that people are more willing to buy a product if they have the change to "try before you buy" it.

This guide shows you how to create an online interactive demo of your app - like the one on right-hand side - in just a couple of minutes, for free. Your demo will be interactive, guided, online, easy to embed in your website or blog, and will run in the browser or on mobile devices.

1Make up your mind about the scenario you want to demo

One of the best selling scenario is showing your potential users how your app solves one of their problems.

2Take screenshots of this scenario, screen by screen

To take screenshots of the Apple TV App, follow these steps:

  • Install Xcode from the Mac App Store
  • Connect your Apple TV to your Mac with a USB-C to USB cable
  • Open Xcode and go to the Window menu
  • Open the Devices window
  • Select your Apple TV
  • Click on the Take Screenshot button
3Sign up to www.AppDemoStore.com

You can sign in from your desktop or mobile device, with your Google or Facebook Account or create an AppDemoStore account. You can create one demo with the FREE account.

4Create a new demo and Upload your screenshots to it

In the section "My Demos", click the "Create Demo" button. Select the Apple TV frame for your demo (available in the Others tab) and give your demo a relevant name. The frame will be visible when the demo is viewed on a computer and not visible when viewed on a mobile device.

Upload your screenshots to your demo by clicking the button "Upload Screenshots" and selecting the files from your disk (multiple file upload is possible).

5Add interaction, animations and annotations.
  • Use the "Hotspot" control to add interaction between your screenshots. You can choose the transition effect between screens (slide up/down, fade). More details here.
  • Use the "Textbox", "Callout" and "Link" controls to add annotations, explanations, auto-typing and links.
  • Use the "Timer" control to simulate loading effects or show a screen for a limited time (e.g. splash screen).
  • Use the "Scrollable Area" control to create horizontal or vertical scrollable areas. More details here.
  • Use the "Arrow" control to add customizable arrows. More details here.
  • Use the "iFrame" control to embed webpages in your demo.
  • Use the "Image" control to add small images on top of the screenshots.
  • Use the "Video" control to embed a YouTube video in your demo.
  • Use the "Sound" control to upload audio files or provide a text to be spoken with our Text-to-Speech functionality. More details here.
  • Use the "User Input" control to let users type information into a field that is carried over to the next screens. More details here.
The demo is HTML-based, thus runs in any desktop or mobile browser. We support the free account with Google-ads, but we try to keep them at a minimum. You can remove all the ads by upgrading to PRO.


Common use cases for using your demo
  • Share the link to your demo via Email or social networks.
  • Embed demo in your website or HTML email. Get the embedding code on the demo page by clicking the button "Embed". Your prospective users will be able to click through your app demo right on your website or email.
  • Embed the demo into your Facebook Page. Learn how to do this here.
  • Embed demo in your app. Learn how to do this here.
  • Download your demo as an HTML, ZIP or PDF and use it as you wish.
  • Capture leads and feedback with your demo.
  • Get in-depth demo analytics such as where did user click, interaction flow, exit screens, etc. More details here.
  • Use it as a starting point for generating a demo video for your app. More details here.

March 7, 2016

How to install an APK demo app on your Android device

Quick intro

Once you have an APK demo app it's really easy to install it on your Android device.

This will allow you to run your demo as a native app and it will even work without an internet connection.

To learn how to create the demo app APK follow this guide: How to build a native Android app demo

How it works


1 Enable Unknown Sources in your phone's security settings

Go to:

Settings -> Security -> Unknown sources

2 Connect your phone to your computer using a USB cable

3 Enable Transfer Files

On the phone you should get a notification like USB for charging - touch for more options.
Tap on it and enable Transfer files.

4 Copy the APK file

On the computer open the File Explorer tool (like Windows Explorer on Windows and Finder on Mac), locate the phone and copy the APK file to the phone's memory (for example in the Downloads folder).

5 Use a File Manager app to open the APK file

There's no default File Manager in Android so you have to install one - our favorite is from Asus: File Manager - but any other one would do the job.

6 Install the APK file

Open the file manager app and tap on the APK file. It will request your permission and the App will be installed on your device.

That's it: you now have your app demo installed on your Android device as an APK file.


How to build an Android demo app and export it as APK file

Quick intro

This guide explains how to build a native Android app demo and export it as an APK file.

All demo resources are packaged within the app, so your demo will behave as a native Android app and it will work even without an internet connection.

In order to create an Android app you need to have Android Studio installed - check out this guide for details: How to Install Android Studio.
You also need to have your demo downloaded as a ZIP file and unzipped on your computer.


How it works


1 Download the Android app project

The first step you have to perform is to download the Android app project template from AppSemoStore.com: AppDemoStore_Android_App_v1.4.zip

This is a ready-made app project which you can import into Android Studio. It contains a simple Android app which loads a demo html page in full-screen mode.

So, download the zip file and unzip it somewhere on your computer - for example on your D: drive.
2 Launch Android Studio

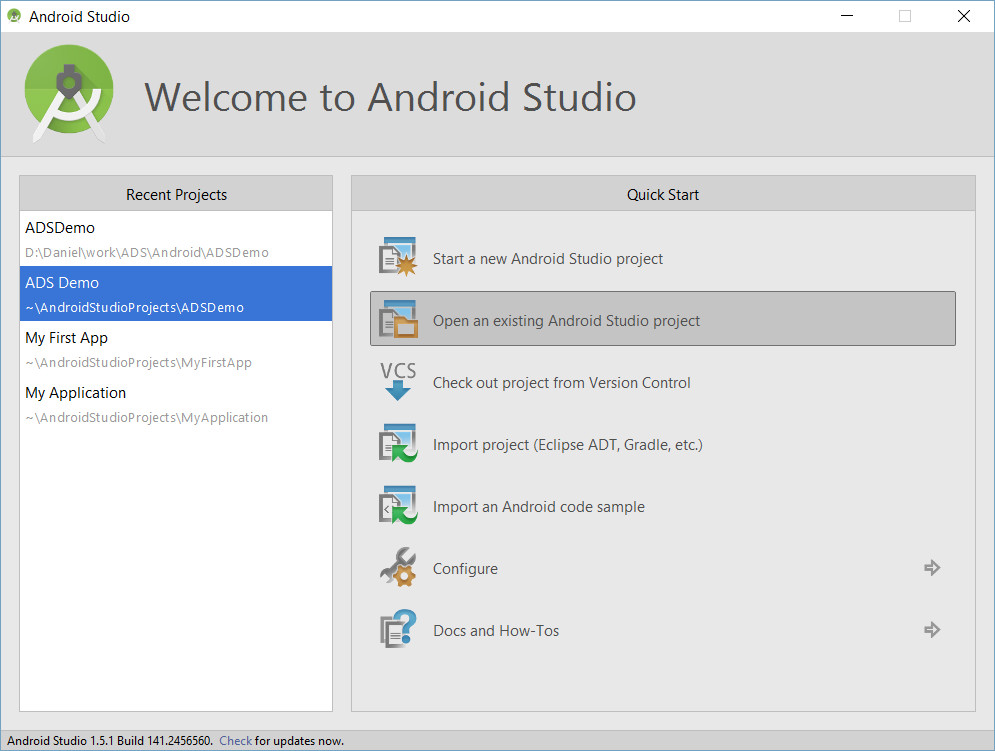
Launch Android Studio and, in the Quick Start panel, select Open an Existing Android Studio project.

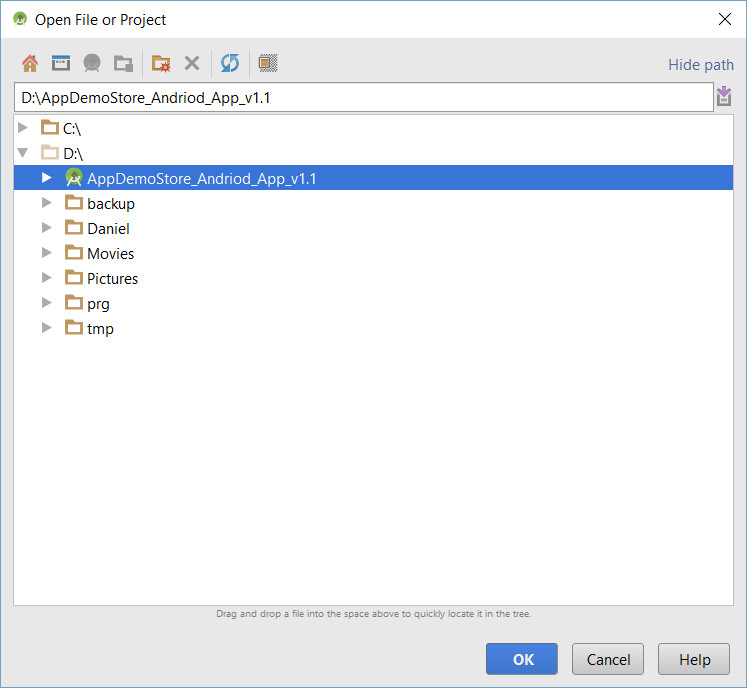
Locate the folder where you have downloaded the AppDemoStore app project and open it.
Select the app project folder:
Loading the project takes a while - give it some time.
Click the vertical 1:Project tab to open your project:
3 Copy your demo HTML files

In Android Studio, locate the demo index.html file in the folder: app/assets/demo/

This is just a sample file which you have to replace with your demo files - you can safely delete it.

Copy your demo files inside the app/assets/demo/ folder. Of course, you need to have your AppDemoStore demo downloaded (as a ZIP archive) and unzipped into a local folder - for info on how to do that check this FAQ.

Tip: Copy all your demo files from Windows Explorer with Ctrl+C and paste them inside the app/assets/demo/ folder in Android Studio with Ctrl+V.

The app will specifically look for the demo html file app/assets/demo/index.html - so make sure it's there before moving further.
4 Test the app with the Android Emulator

Android Studio allows you to run your app on the Android Emulator which is a software that simulates an actual Android device on your computer.

Click the green "play" icon in Android Studio to run your app.

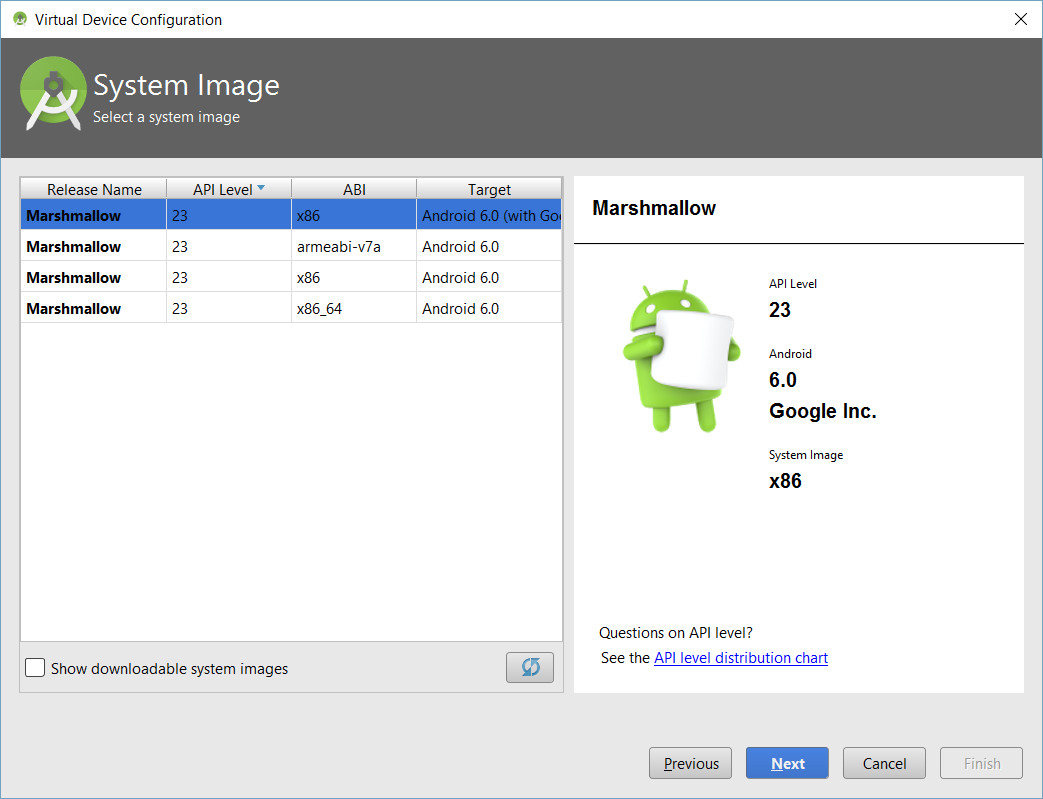
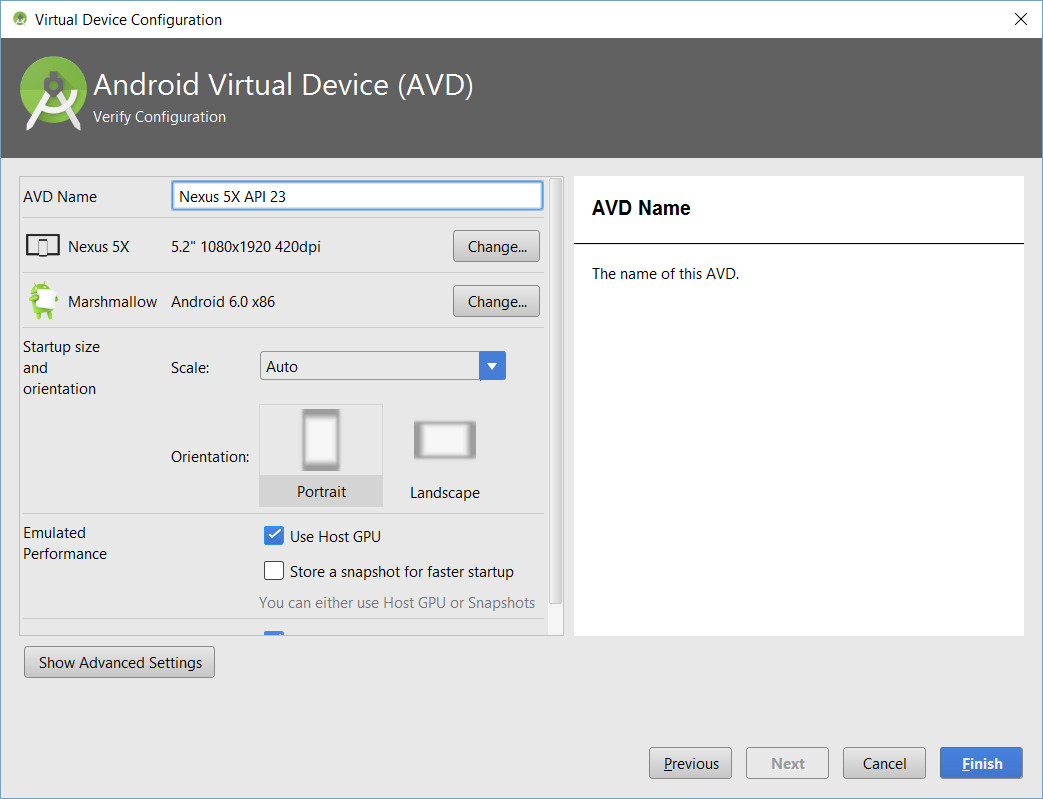
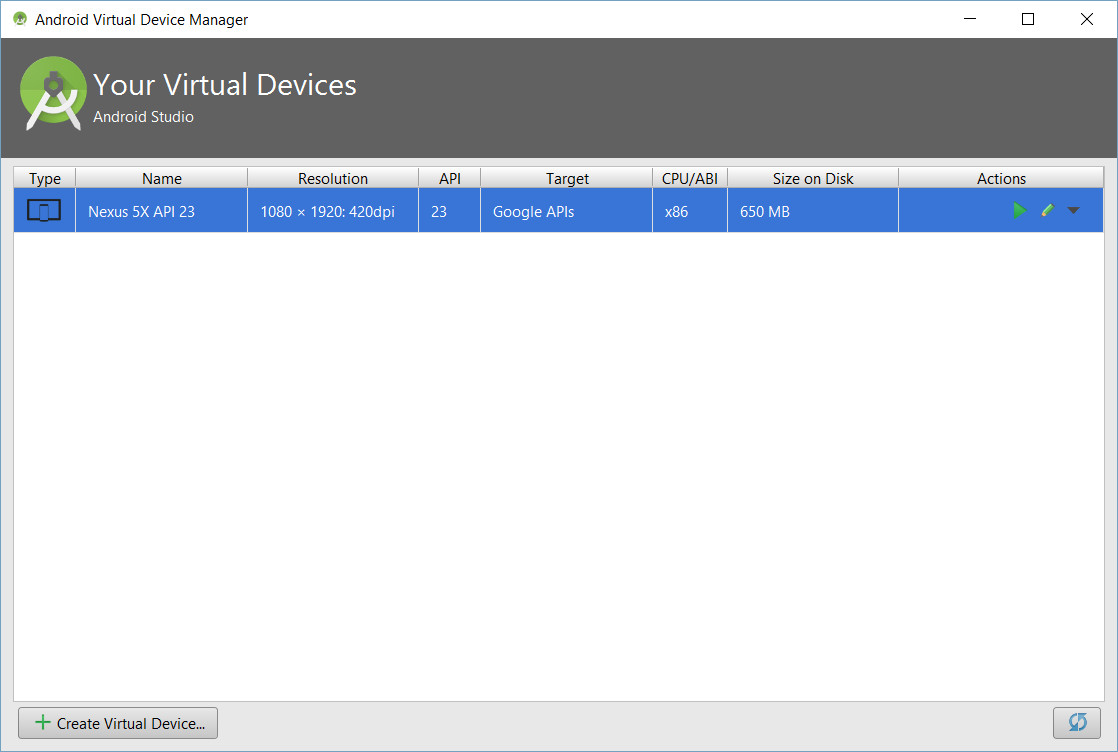
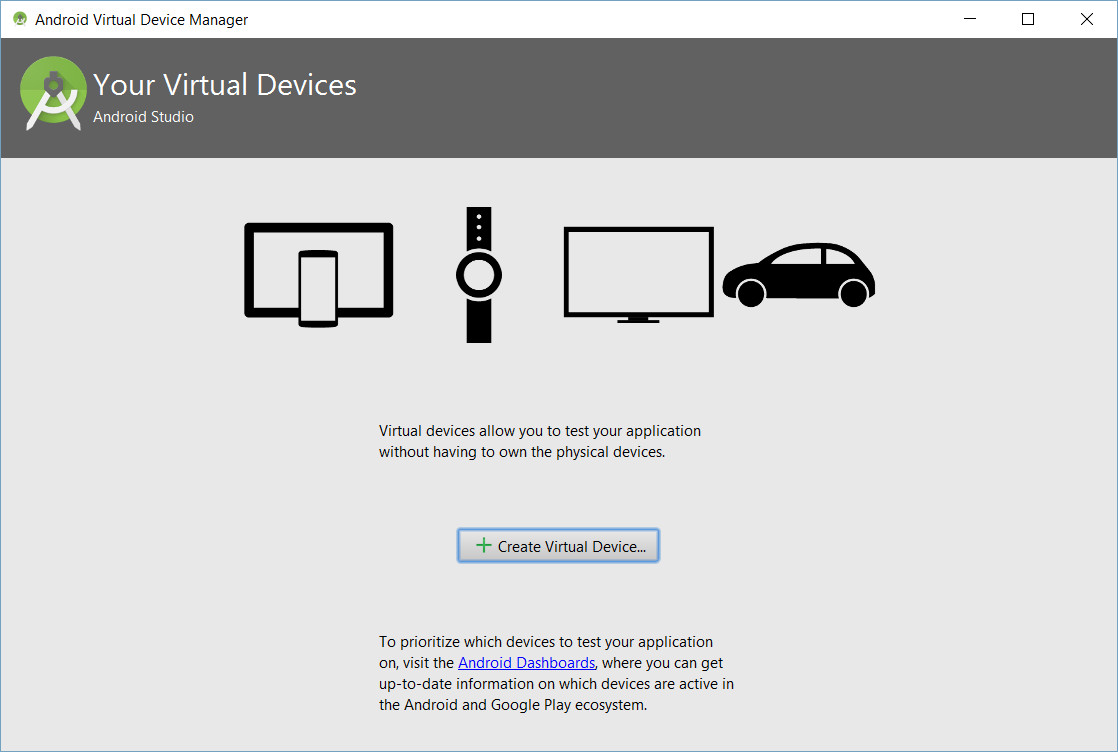
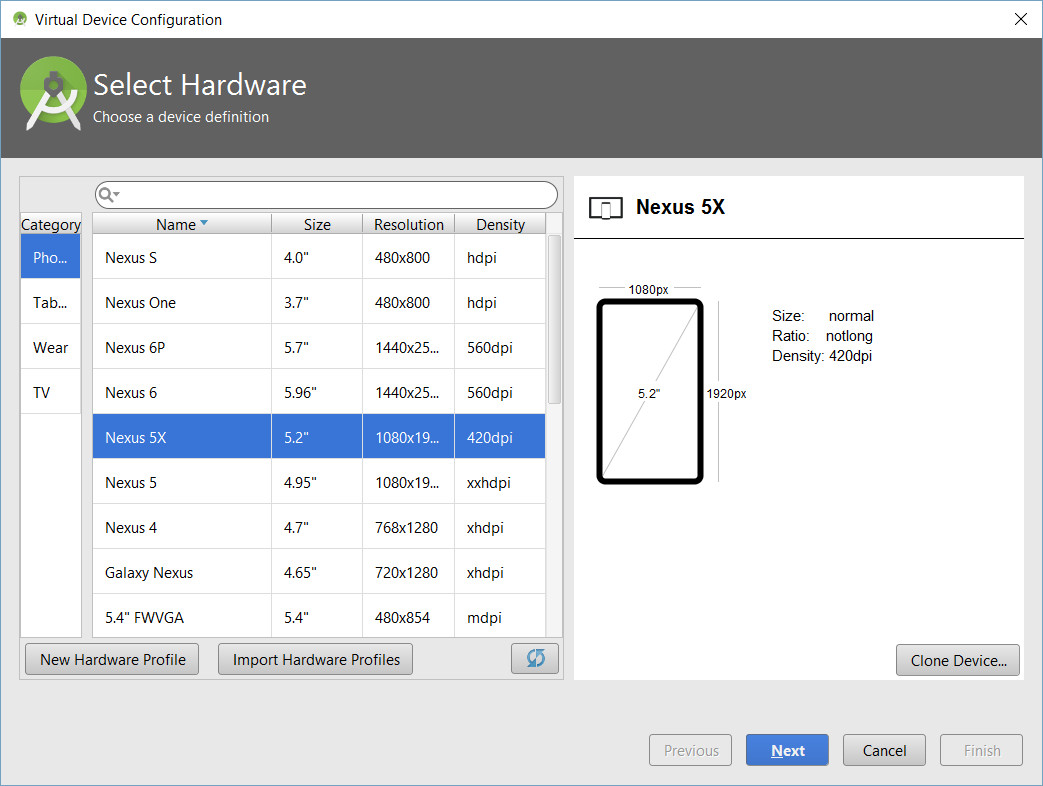
At the beginning you'll have to create an Android Virtual Device like in the images below.
Select Nexus 5X:
Select Android 6.0 with Google API:
Use default setting:
Your Virtual Device is created:
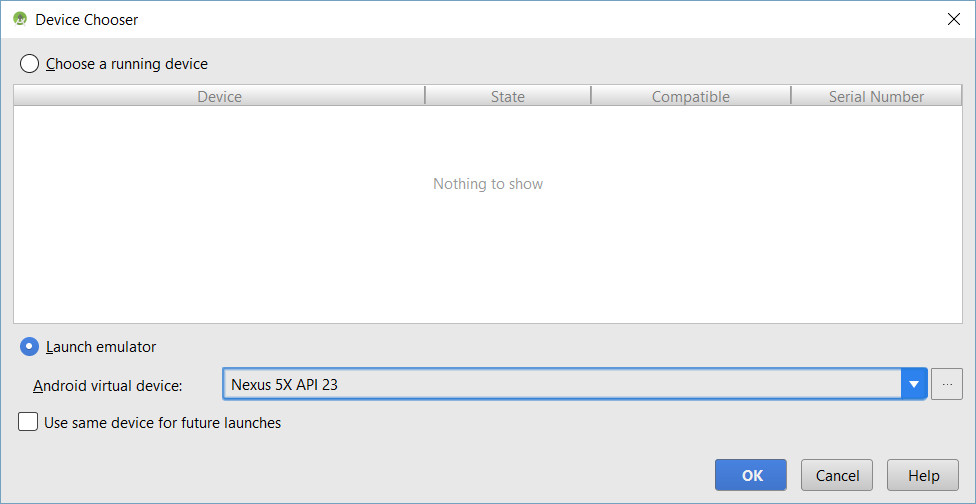
5 Run your app on the newly created Android Virtual Device

Select the Android Virtual Device you created to run your app on it.
6 Run your demo

Make sure everything runs as expected.

The image shows the default html page that comes with the AppDemoStore Android template. But you should have replaced that with your own demo, so you should be able to test it on your computer, before installing it on the device.
7 Generate the signed APK file

To be able to distribute your app as an APK file, you have to sign it first.

Follow this quick guide from Google: Signing Your Applications - you can jump straight to section Signing Your App in Android Studio.

If you copied the app template to your D: drive you'll find the signed APK file in the following folder:

D:\AppDemoStore_Andriod_App_v1.2\app

You can copy the app-release.apk file and rename it - you can give it the name of your demo for example.

Install APK file on Android device

So, you've got your demo as an APK file which you can install on Android devices as a native app. This article explains how to do that: How to install an APK demo file on your Android device.


Helpful Articles


How to Install Android Studio

Quick intro

This guide explains how to install Android Studio on your computer.

As a prerequisite, you also have to install Java 7.


How it works


1 Download Java 7 and install it

You can download the Java 7 SDK from the official Oracle Java download page: Download Java.

Accept the License Agreement and chose the right version for your computer: e.g. Windows x64 for a 64 bit Windows machine.

The installation is pretty straight forward - you can simply accept all default settings and press Next a few times.
2 Download Android Studio and install it

You can download Android Studio from the official Android developer site: Download Android Studio.

Again, accept the License Agreement and hit the Download button.

The installation of Android Studio is also straight forward - you can accept all default settings as well. It should automatically find the installed Java on your computer.

The download and installation can take quite some time, but at the end of this both the Android Studio and the Android SDK will be installed and ready for action.

Your setup is now complete!

Next, learn how to create an Android app of your demo and install it on your device as a native app: How to build a native Android demo app


Helpful Articles


February 25, 2016

HOW TO: Play a YouTube Video Inside an iPhone Device Image

Quick intro

This guide explains how to easily display a YouTube video inside an iPhone frame. The result will look like in the demo video on the right-hand side (play the video to see how it works).

The process described here also works for other devices, such as iPad, Apple Watch, MacBook computers, Samsung Galaxy devices and many others.


How-to Guide


1 Create a new iPhone demo
  • First sign in or sign up for a free account on AppDemoStore.com
  • Create a new demo by clicking the button "Create Demo"
  • Select an iPhone frame (iPhone 7, iPhone 7 Plus, iPhone 6, etc.) from the device frame gallery and click "Save"


2 Add a screen

Once in the Demo Editor, the first thing you'll have to do is to add a screen. To do this, click the Plus button then either Upload Screenshots or Add Empty Screen.

Uploading a screenshot is useful when the video (which will come on top) is smaller than the iPhone frame. Also, the image you upload will appear as the demo thumbnail in the gallery or when sharing the demo.


3 Embed the YouTube Video
  • Add a video control to the screen, by clicking the "Add Video" icon
  • Insert the YouTube video link as showed in the image. The video will display immediately
  • Drag the corners of the Video control to position it accordingly
  • Click the "Preview" button and if everything is fine save the demo


4 Embed the demo (video + frame) into your website

To be able to share the demo, you'll have to change its privacy level from private (the default) to public. To do this, click Settings -> Visibility and select the

public

option.

Now you can copy the embed code and paste it into your website or blog. To find the embed code: on the Demo Page click the Share option and then the Embed tab.

When embedded, the demo video will look like in this page.


February 18, 2016

HOW TO: Demo your Windows App in the Browser

Show your Windows App in style

This article explains how to easily create a clickable demo or tutorial of a Windows app, to be used for promotion or knowledge transfer. The method proposed here is easy and fast, requires no technical skills and it is based on app screenshots. The result is an HTML-based app demo that can be embedded in a website or blog, installed on mobile devices or used in presentations.

1Decide for the scenario you want to show in the demo

One of the best scenarios is showing your potential users how the app solves one of their problems.

2Take screenshots of this scenario, screen by screen

To take screenshots on a Nokia Lumia 925, press the Power Key and the Start Key at the same time. You will find the screenshots in Photos > Albums > Screenshots. For other Windows devices search the Windows Support Database for "take a screenshot on ...".

3Sign up to www.AppDemoStore.com

You can sign up from your desktop or mobile device. Once signed in, you will be directed to "My Demos" page.

4Create a new demo and Upload the app screenshots to it

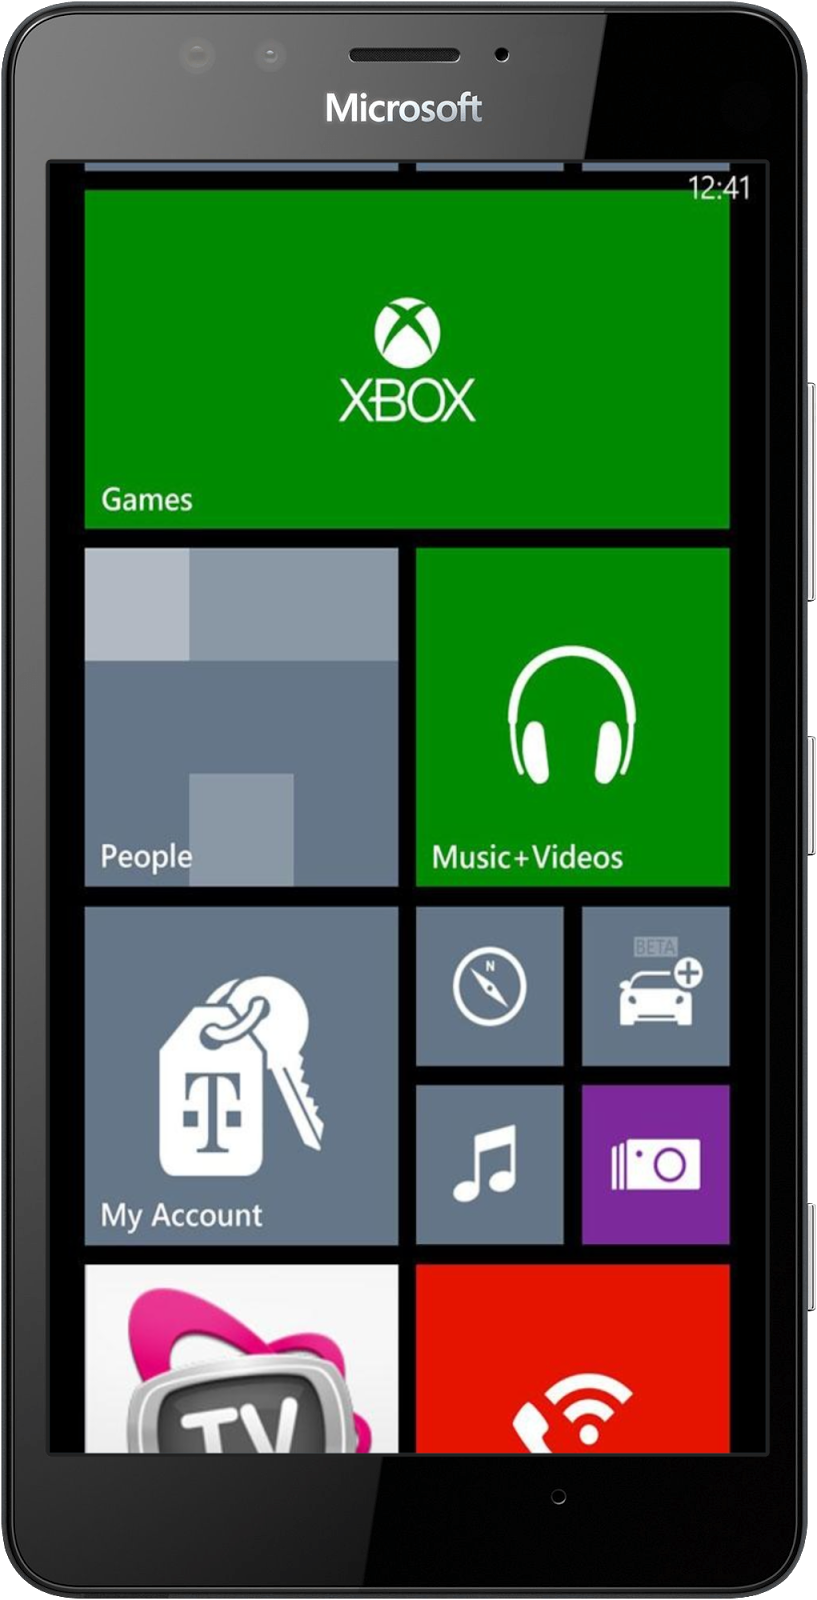
In the section "My Demos", click the "Create Demo" button. Select a Windows Phone frame (you can find the latest Windows Phones in the category Phones > Microsoft). The frame will be visible when the demo is viewed on a computer and not visible when viewed on a mobile device. The frame can be changed later.

To upload the screenshots click the button "Upload Screenshots" and select the files from your disk. Multiple file upload is possible, but you can upload a maximum of 10 screenshots at once. To upload more screenshots, just use the button "Upload Screenshots" several times.

Scrollable Screens: To create scrollable screens, just upload a long image and then set its property "Image Layout" to "scroll". More details here.

5Add interaction, animations and annotations.
  • Use the "Hotspot" control to add interaction between your screenshots. You can choose the transition effect between screens (slide up/down, fade). More details here.
  • Use the "Textbox", "Callout" and "Link" controls to add annotations, explanations, auto-typing and links.
  • Use the "Timer" control to simulate loading effects or show a screen for a limited time (e.g. splash screen).
  • Use the "Arrow" control to add customizable arrows. More details here.
  • Use the "iFrame" control to embed webpages in your demo.
  • Use the "Image" control to add small images on top of the screenshots.
  • Use the "Video" control to embed a YouTube video or a video stored on a server. More details here.
  • Use the "Sound" control to upload audio files or provide a text to be spoken with our Text-to-Speech functionality. More details here.
  • Use the "User Input" control to let users type information into a field that is carried over to the next screens. More details here.


The final demo or tutorial is HTML-based and runs in any desktop or mobile browser.


Image generated on PicApp.net

Common use cases for your Windows app demo/tutorial
  • Share the link to your demo via Email or social networks.
  • Embed demo in your website or HTML email.
  • Embed the demo into your Facebook Page. Learn how to do this here.
  • Embed demo in your app. Learn how to do this here.
  • Download your demo as an HTML, ZIP or APK or PDF.
  • Capture leads and feedback with your demo.
  • Get in-depth demo analytics such as where did the user click, interaction flow, exit screens, etc. More details here.
  • Use it as a starting point for generating a demo video for your app. More details here.

February 16, 2016

HOW TO: Demo your Nexus App in the Browser

Show your Nexus App in style

This article explains how to easily create a clickable demo or tutorial of a Nexus app, to be used for promotion or knowledge transfer. The method proposed here is easy and fast, requires no technical skills and it is based on app screenshots. The result is an HTML-based app demo that can be embedded in a website or blog, installed on mobile devices or used in presentations.

1Decide for the scenario you want to show in the demo

One of the best scenarios is showing your potential users how the app solves one of their problems.

2Take screenshots of this scenario, screen by screen

To take screenshots on a Nexus 9 device, press Power and Volume Down keys at the same time. When you hear a camera shutter sound effect, the screenshot is ready.

3Sign up to www.AppDemoStore.com

You can sign in from your desktop or mobile device. Once signed in, you will be directed to "My Demos" page.

4Create a new demo and Upload the app screenshots to it

In the section "My Demos", click the "Create Demo" button. Select a Nexus frame (you find the Nexus tablets in the category Tablets and the Nexus Phones in the category Phones —> Google). The frame will be visible when the demo is viewed on a computer and not visible when viewed on a mobile device. The frame can be changed later.

To upload the screenshots click the button "Upload Screenshots" and select the files from your disk. Multiple file upload is possible, but you can upload a maximum of 10 screenshots at once. To upload more screenshots, just use the button "Upload Screenshots" several times.

Scrollable Screens: To create scrollable screens, just upload a long image and then set its property "Image Layout" to "scroll". More details here.

5Add interaction, animations and annotations.
  • Use the "Hotspot" control to add interaction between your screenshots. You can choose the transition effect between screens (slide up/down, fade). More details here.
  • Use the "Textbox", "Callout" and "Link" controls to add annotations, explanations, auto-typing and links.
  • Use the "Timer" control to simulate loading effects or show a screen for a limited time (e.g. splash screen).
  • Use the "Arrow" control to add customizable arrows. More details here.
  • Use the "iFrame" control to embed webpages in your demo.
  • Use the "Image" control to add small images on top of the screenshots.
  • Use the "Video" control to embed a YouTube video or a video stored on a server. More details here.
  • Use the "Sound" control to upload audio files or provide a text to be spoken with our Text-to-Speech functionality. More details here.
  • Use the "User Input" control to let users type information into a field that is carried over to the next screens. More details here.


The final demo or tutorial is HTML-based and runs in any desktop or mobile browser.


Image generated on PicApp.net

Common use cases for your app demo or tutorial
  • Share the link to your demo via Email or social networks.
  • Embed demo in your website or HTML email.
  • Embed the demo into your Facebook Page. Learn how to do this here.
  • Embed demo in your app. Learn how to do this here.
  • Download your demo as an HTML, ZIP or APK or PDF.
  • Capture leads and feedback with your demo.
  • Get in-depth demo analytics such as where did user click, interaction flow, exit screens, etc. More details here.
  • Use it as a starting point for generating a demo video for your app. More details here.
January 29, 2016

HOW TO: Test your Website or App on Mobile Devices in the Browser

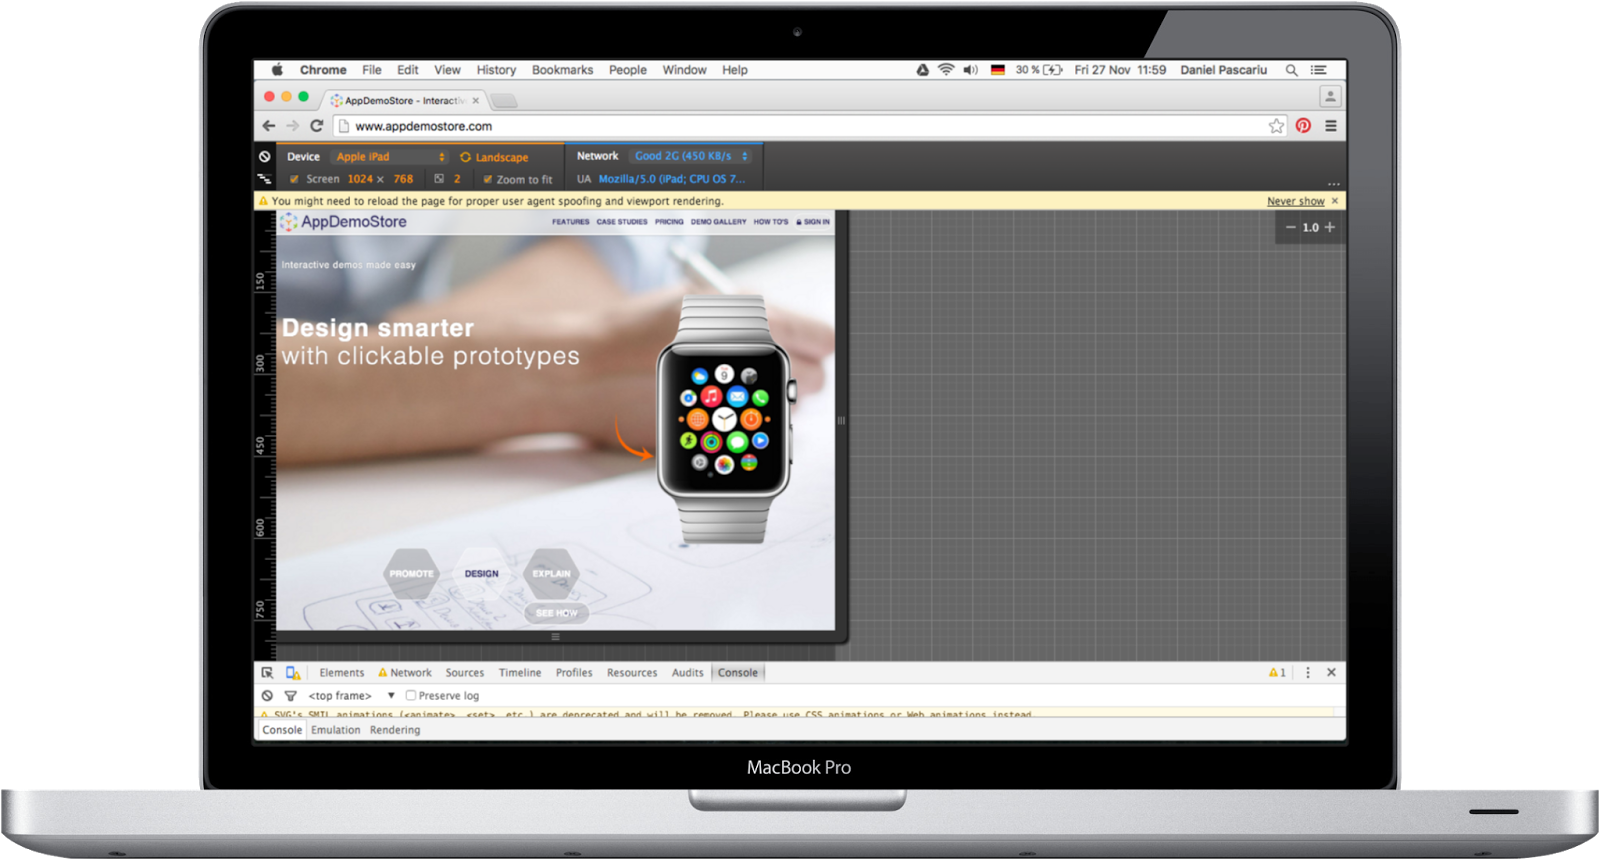
This article presents 3 simple ways to test your website or web app on different mobile devices, in the browser. The three testing options described here are: Safari's Responsive Design Mode, Chrome's Developer Mode and AppDemoStore's Online Simulator.

1 Safari's Responsive Design Mode


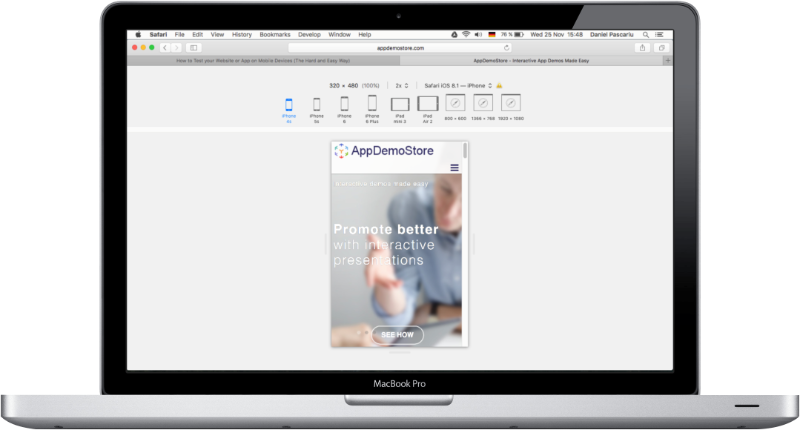
The Responsive Design Mode in the latest Safari version (9.0.1) lets you view how a website displays on different devices: iPhone 4s, iPhone 5s, iPhone 6, iPhone 6 Plus, iPad Mini 3, iPad Air 2, 800 x 600, 1366 x 768 and 1920 x 1080.

To access it click Develop in the Safari upper menu and select Enter Responsive Design Mode. Once you are in the Responsive Design Mode, the browser screen will look like in the image above.


2 Chrome's Developer Mode


To access Chrome's Developer Mode follow these steps:

  • Click View in Chrome's upper menu and select Developer —> Developer Tools from the list.
  • In the Developer Console (that opens at the the bottom of the page) click Toggle Device Mode (the small device icon in the top-left of the console window).
  • The Device Mode looks like in the image above and allows you to test your website or web app on different devices.

Advantages of Chrome compared to Safari:

  • More devices: Amazon Kindle Fire, Apple iPad Mini, iPhone 4, 5, 6, 6 Plus, Blackberry PlayBook and Z30, Google Nexus 4, 5, 6, 7, 10, LG Optimus, Laptop, Nokia Lumia 520 and N9, Samsung Galaxy Note 2 and 3, Samsung Galaxy S3 and S4.
  • Network simulation (GPRS, 3G, 4G, DSL, WiFi).
  • Switch between Landscape and Portrait mode.


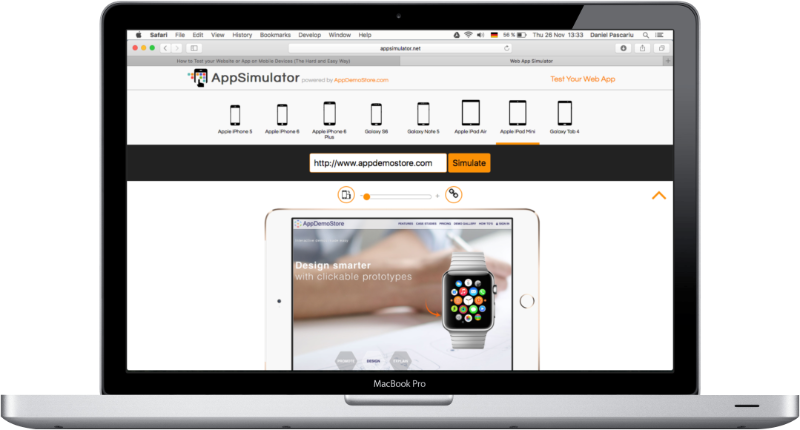
3 AppDemoStore's Web App Online Simulator


Although Chrome and Safari's testing features work great, they are missing the possibility to share a certain testing scenario with your colleagues. For example, if you find some issue in the way a website or web app displays on the iPhone in landscape-mode, you might want to share it with the responsible team. Our Web App Online Simulator allows you to do this.

Advantages of the Web App Online Simulator compared to Chrome and Safari:

  • Can be accessed from the browser with a simple link: Web App Online Simulator.
  • It's easy to use (just select a device, type your URL and done).
  • You can test your website or web app on a variety of mainstream devices.
  • You can easily switch between Landscape and Portrait mode.
  • You can easily share a certain scenario (URL + device) with your colleagues via a generated URL.

Next time you need to test your new web app or website on a mobile device you don't have, give Web App Online Simulator a try.

January 27, 2016

HOW TO: Demo your Blackberry App in the Browser

Show your Blackberry App in style

This article explains how to easily create a clickable demo or tutorial of a Blackberry app, to be used for promotion or knowledge transfer. The method proposed here is easy and fast, requires no technical skills and it is based on app screenshots. The result is an HTML-based app demo that can be embedded in a website or blog, installed on mobile devices or used in presentations.

1Decide for the scenario you want to show in the demo

One of the best scenarios is showing your potential users how the app solves one of their problems.

2Take screenshots of this scenario, screen by screen

When you are on a screen that you want to capture, press and hold both the volume up and volume down keys at the same time for a few seconds. When you hear a camera shutter sound effect, the screenshot is ready.

3Sign up to www.AppDemoStore.com

You can sign up from your desktop or mobile device. Once signed in, you will be directed to "My Demos" page.

4Create a new demo and Upload the app screenshots to it

In the section "My Demos", click the "Create Demo" button. Select a Blackberry frame (you find some of the latest Blackberry frames such as Classic, Q10 and Z10 in the category Phones —> More). The frame will be visible when the demo is viewed on a computer and not visible when viewed on a mobile device. The frame can be changed later.

To upload the screenshots click the button "Upload Screenshots" and select the files from your disk. Multiple file upload is possible, but you can upload a maximum of 10 screenshots at once. To upload more screenshots, just use the button "Upload Screenshots" several times.

Scrollable Screens: To create scrollable screens, just upload a long image and then set its property "Image Layout" to "scroll". More details here.

5Add interaction, animations and annotations.
  • Use the "Hotspot" control to add interaction between your screenshots. You can choose the transition effect between screens (slide up/down, fade). More details here.
  • Use the "Textbox", "Callout" and "Link" controls to add annotations, explanations, auto-typing and links.
  • Use the "Timer" control to simulate loading effects or show a screen for a limited time (e.g. splash screen).
  • Use the "Arrow" control to add customizable arrows. More details here.
  • Use the "iFrame" control to embed webpages in your demo.
  • Use the "Image" control to add small images on top of the screenshots.
  • Use the "Video" control to embed a YouTube video or a video stored on a server. More details here.
  • Use the "Sound" control to upload audio files or provide a text to be spoken with our Text-to-Speech functionality. More details here.
  • Use the "User Input" control to let users type information into a field that is carried over to the next screens. More details here.


The final demo or tutorial is HTML-based and runs in any desktop or mobile browser.


Common use cases for your app demo or tutorial
  • Share the link to your demo via Email or social networks.
  • Embed demo in your website or HTML email.
  • Embed the demo into your Facebook Page. Learn how to do this here.
  • Embed demo in your app. Learn how to do this here.
  • Download your demo as an HTML, ZIP or APK or PDF.
  • Capture leads and feedback with your demo.
  • Get in-depth demo analytics such as where did user click, interaction flow, exit screens, etc. More details here.
  • Use it as a starting point for generating a demo video for your app. More details here.
January 12, 2016

How to Print Web Pages as PDF documents

All major browsers have recently built major improvements into their software, all with the purpose to make our web surfing experience more pleasant and our lives easier. One of these great improvements come in very handy when you want to save web pages as PDF documents. You no longer have to install strange tools and drivers - you can simply print web pages as PDF documents, directly from your favorite browser.

Here are step-by-step descriptions for PDF printing for all major browsers.


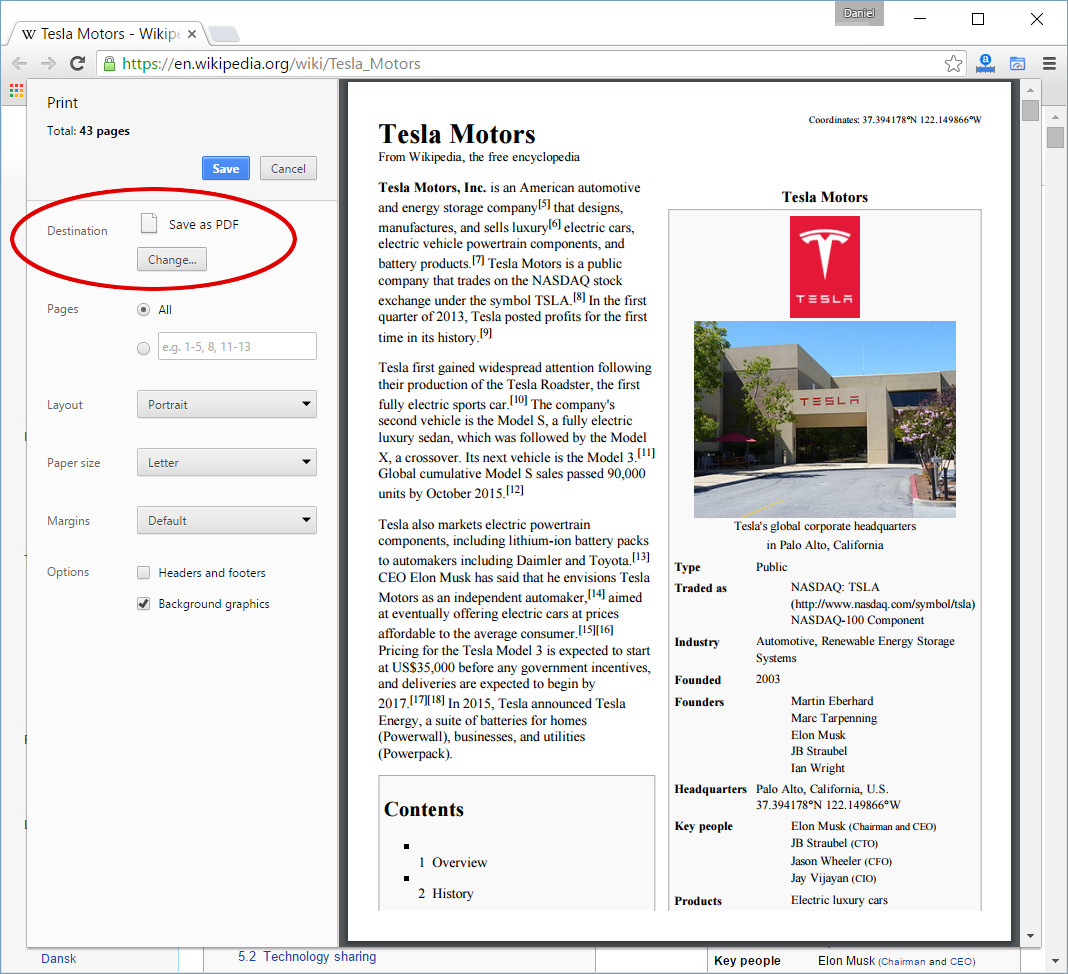
Google Chrome: Save as PDF

  1. Open the browser menu and click on Print (or press Ctrl+P)
  2. Change the Destination field and select Save as PDF
  3. Click the Save button to save the PDF file

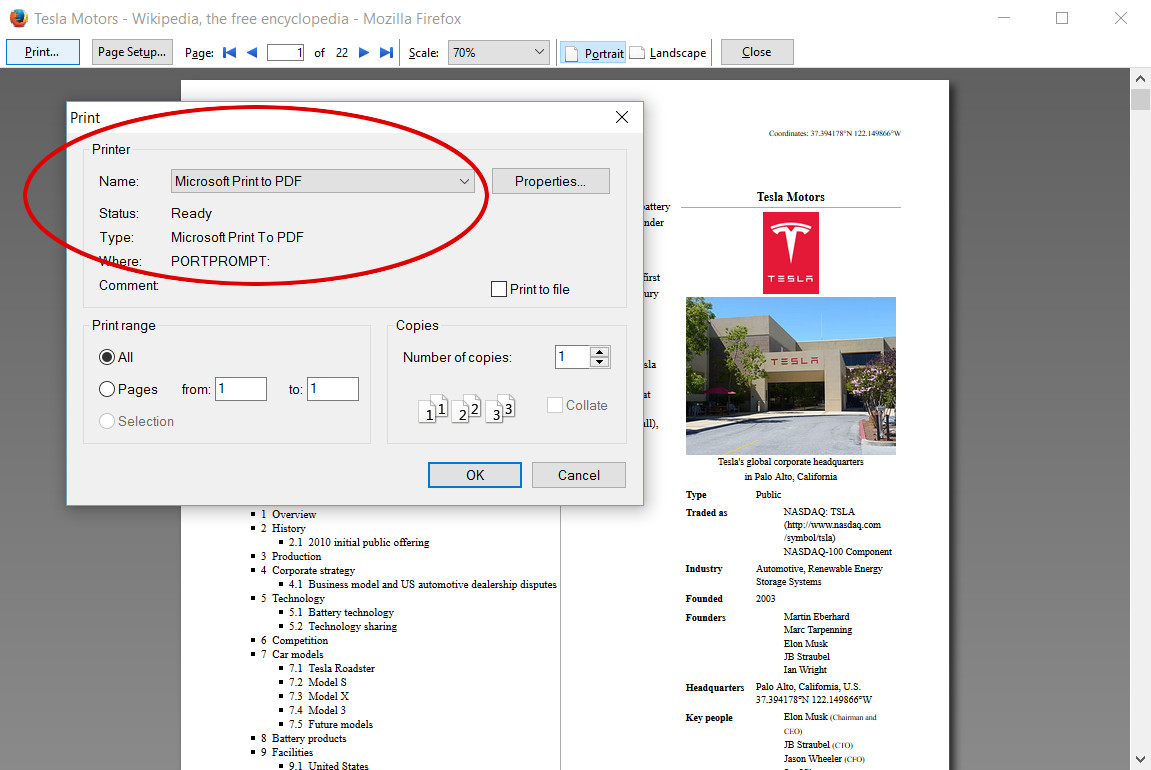
Mozilla Firefox: Print to PDF

  1. Open the browser menu and click on Print (or press Ctrl+P)
  2. Click the Print... button
  3. Change the printer name to Microsoft Print to PDF
  4. Click the OK button to save the PDF file


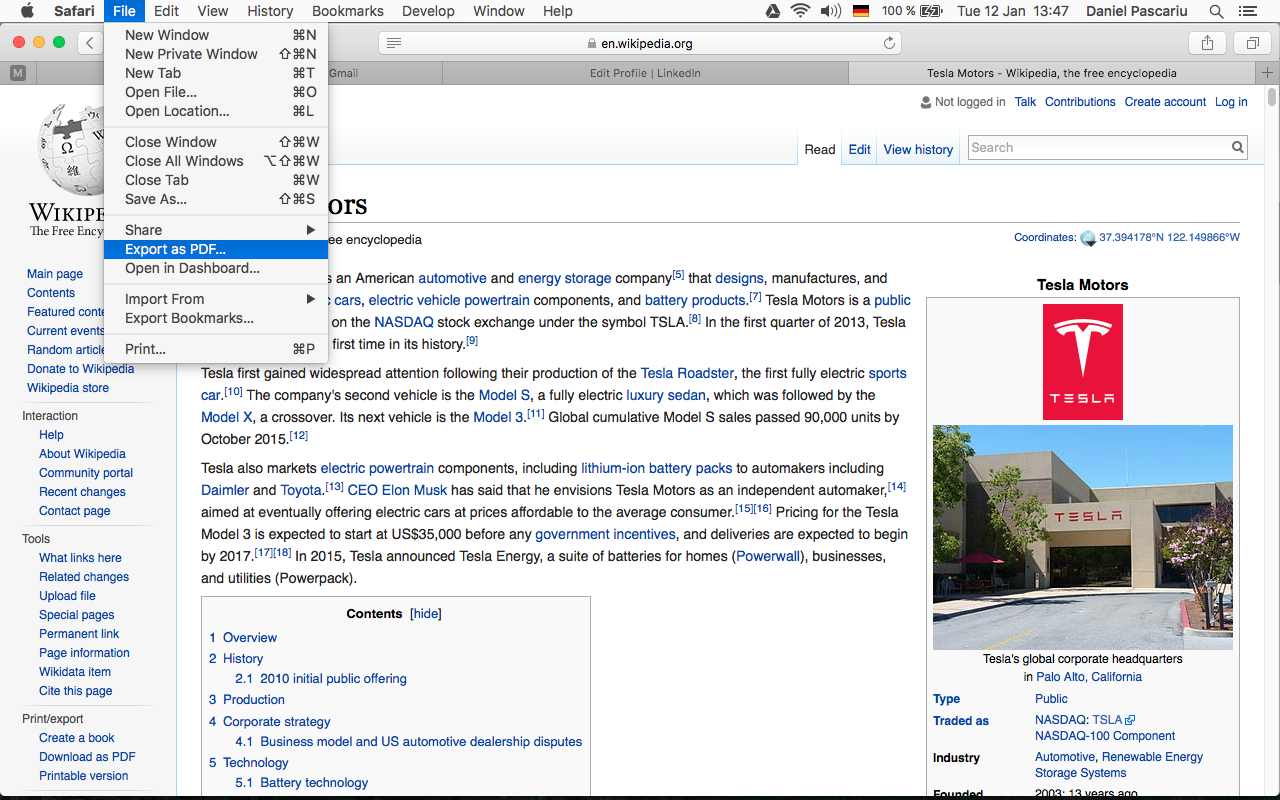
Safari on Mac: Export as PDF

  1. Open the browser File menu and click on Export as PDF
  2. Click the Save button to save the PDF file

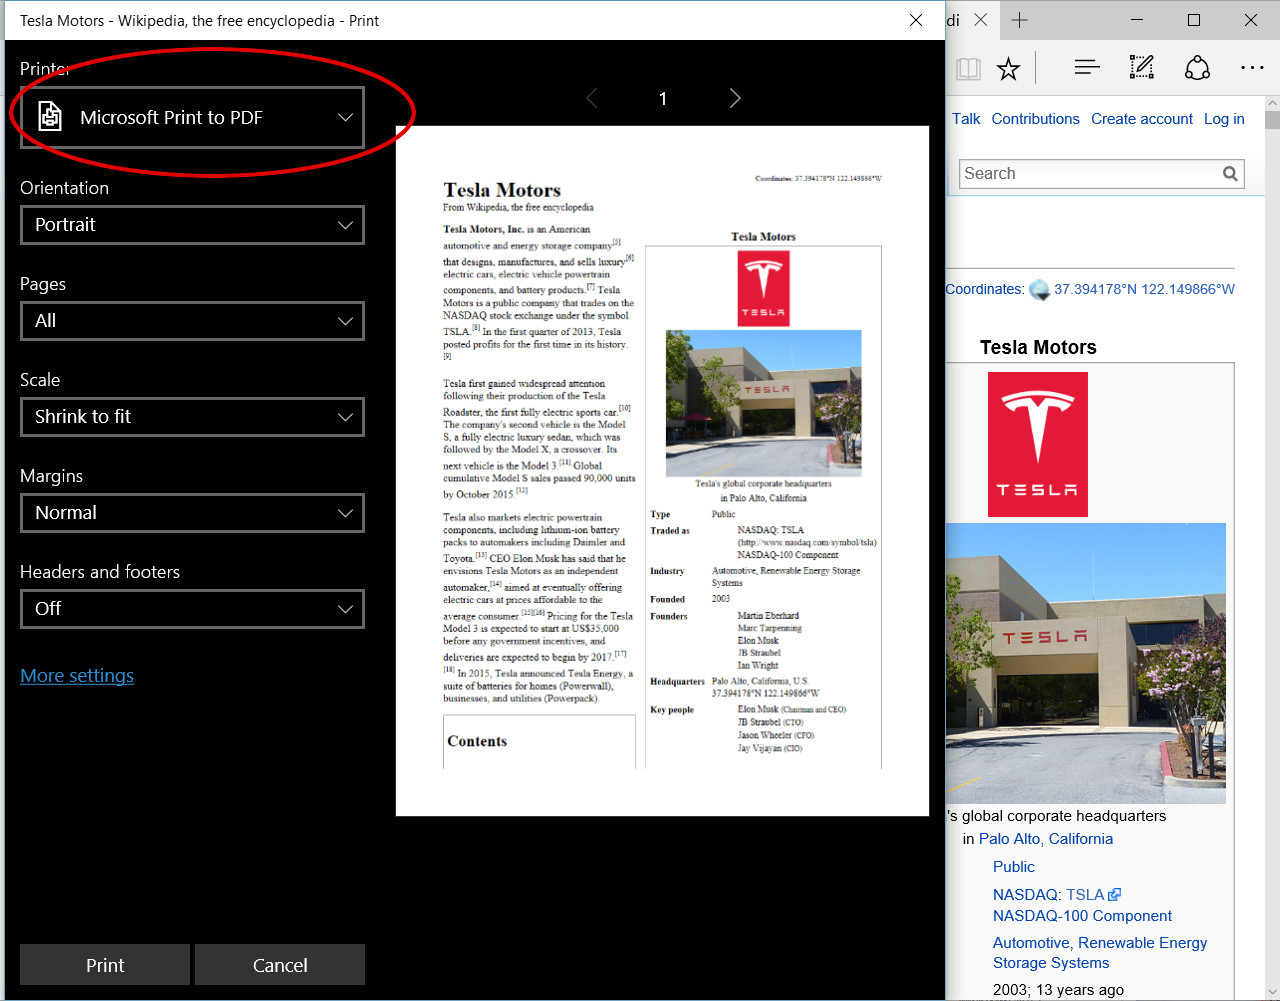
Internet Explorer: Print to PDF

  1. Open the browser menu and click on Print (or press Ctrl+P)
  2. Change the printer name to Microsoft Print to PDF
  3. Click the OK button to save the PDF file

Printing web pages as PDF documents is hugely useful so many times. Now it's also super easy, as you can directly do it from your browser, without the need to install any additional tools.

November 18, 2015

HOW TO: Compress audio files with Audacity

When you upload audio files in your app demos it is important to make the files as small as possible so that they'll play on all mobile platforms. Big audio files sometimes won't be played by mobile browsers as these have build-in mechanisms to load web pages as efficiently as possible - and sometimes they'll just choose not to load sounds.

Follow this guide to learn how to compress your audio files.
We'll use Audacity, which is a wonderful free tool for recording and editing audio files - you can download it here: audacityteam.org.

1 Open an audio file in Audacity

Launch Audacity and open the file you want to compress:

File menu -> Open
2 Export the file

File menu -> Export Audio
3 Set the 64kbps bit rate

Click the Options button in the bottom right corner.

Then set the quality to 64kbps

You can experiment with other values, but we found that the 64kbps is the perfect balance between high quality and small file size.

Now you can save your compressed file. You're done!

A 10 seconds audio file should have below 100 Kb. While a one minute audio should stay below 500 Kb.
As long as your audio files are within these ranges your demo should hear great on most modern mobile devices.

October 19, 2015

HOW TO: Embed a video in your app demo with the VIDEO control

Quick intro

This guide explains how to embed videos from YouTube or from a server into your app demos

Click through the demo on the right-hand side to see a sample.


How it works


1 Add a Video control to your demo

To do so, click the Video icon in the Controls Toolbar while on the screen where you want to add it. Use the mouse to adjust its size.

The Video control can run an embedded video from YouTube or a video hosted on a server.

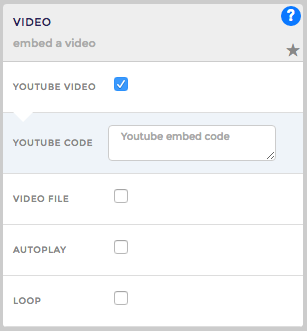
  • If the video is hosted on YouTube: copy the embed code from YouTube, as described in the second step below, and paste it to the YouTube embed code box on the right-hand-side.
  • If the video is hosted on a server: enter the URL of the video to the URL of video file box on the right-hand-side.


2 Get the YouTube embed code

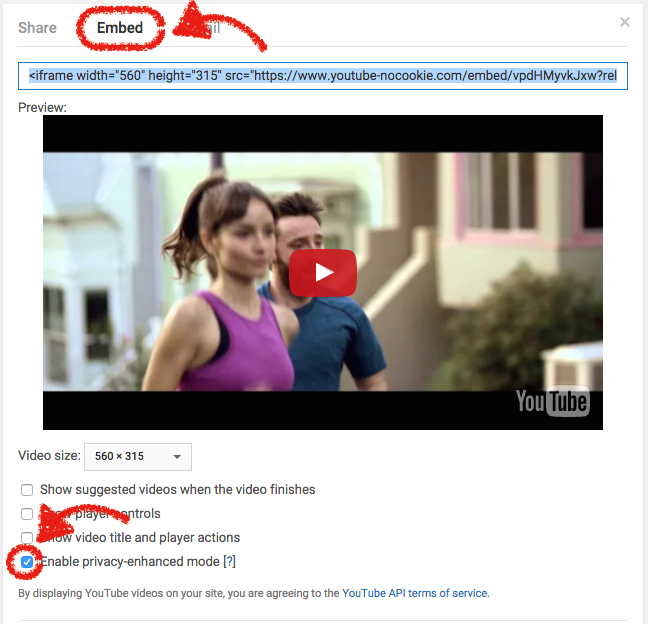
To get the YouTube embed code, go to the video page, click on Embed and then Show more.

You can adjust the video embedding settings as shown in the second screenshot below and then copy the embed code.


HOW TO: Add coach marks to your app demo with the ARROW control

Quick intro

This guide explains how to add different kind of arrows to your app demo. Arrows are great for pointing out important areas on a demo screen.

Click through the demo on the right to see what you can do with the Arrow control.


How it works


1 Add an arrow to any screen in your demo

To do so, click the Arrow icon in the Controls Toolbar while on the screen where you want to add it. The role of the Arrow is to point the user to an important area in the demo. Arrows are not clickable; for creating clickable areas, use the Hotspot control.


2 Customise the Arrow's look using its properties
  • COLOR: customise the color of the arrow; use your own color by providing the color code in the color box (screen 1)
  • STYLE: choose between a couple of arrow styles
  • LINE WIDTH: set up the arrow's width
  • CURVATURE: set up the curvature of the arrow
  • ROTATION: rotate the arrow to obtain the perfect position
  • DELAY: delay the appearance of the Arrow on the screen
  • SAVE PROPERTIES: save the properties (color, width, curvature, etc.) of the selected arrow as the default ones by clicking on the small gray star in the Properties Header


October 13, 2015

HOW TO: Make your app demo clickable with the HOTSPOT control

Quick intro

This guide explains how to use the Hotspot control to add interactivity to your app demo, such as:

  • simulating tappable buttons
  • defining clickable areas
  • explaining multi-touch gestures


Click through the interactive presentation on the right-hand side to see some use cases for the Hotspot.


How it works


1 Add a Hotspot to any screen in your demo

To do so, click the Hotspot icon in the Controls Toolbar while on the screen where you want to add it. The role of the Hotspot is to direct the demo users to another screen in the demo.

By-default, a Hotspot will send the user to the next screen in the demo, but you can easily change this with the property Go to (in the Properties Toolbar on the right-hand side of the demo editor). You can send the user to a certain screen in the demo or to the next/previous screen or Back, which works like the the browser's Back.


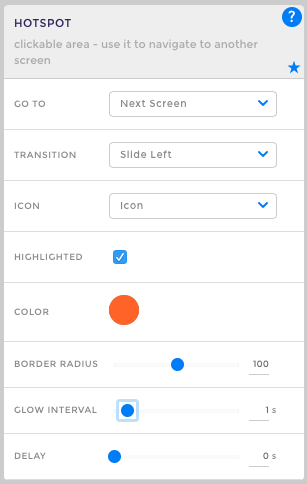
2 Customise the Hotspot's look using its properties
  • TRANSITION: choose between a couple of mobile-specific transition effects such as slide up/down/right/left (demo screen 2)
  • ICON: choose an icon for your Hotspot, such as tap, pinch, slide, etc
  • HIGHLIGHTED: select this if you want no border
  • COLOR: customise the color of the Hotspot border or make it transparent
  • RADIUS: easily change the radius of the Hotspot border from square to round
  • GLOW INTERVAL: make the hotspot glow faster or slower; 0 means no glow
  • DELAY: delay the appearance of the Hotspot on the screen
  • SAVE PROPERTIES: save the properties of the selected Hotspot as the default ones by clicking on the small gray star in the Properties Header

How to Run your Demo Offline on Android

This post explains how to download your demo from AppDemoStore.com, how to copy it on your Android device and how to run it offline (without the need of an internet connection).

In a nutshell, the idea is simple:
  • You download the demo to your computer
  • You transfer it to your Android device
  • You run it on your device, locally, without an internet connection
1 Download your demo

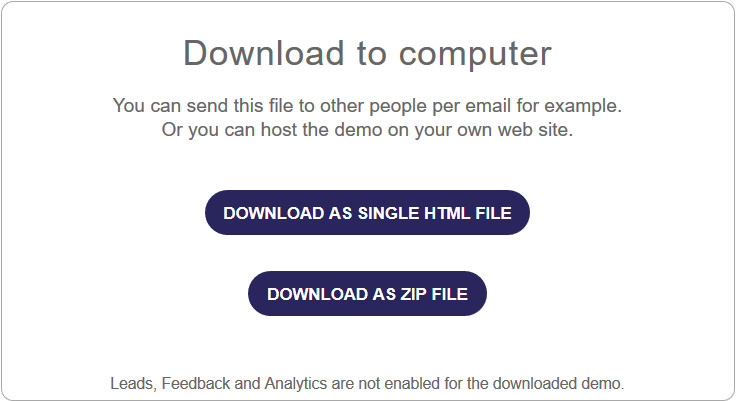
Download your demo either as single HTML file or as a ZIP file to your local computer.

If you download it as a ZIP file, make sure you unzip it into a folder on your computer. The unzipped version contains the demo HTML file as well as all the image files which are part of that demo.
If your demo is really big and you have multiple ZIP files you have to unzip all of them into the same folder.
2 Connect your Android device

Use a USB cable to connect your Android smartphone or tablet to your computer.

Note: Make sure your screen stays unlocked to be able to work with the device from your computer.
3 Open the device Internal Storage

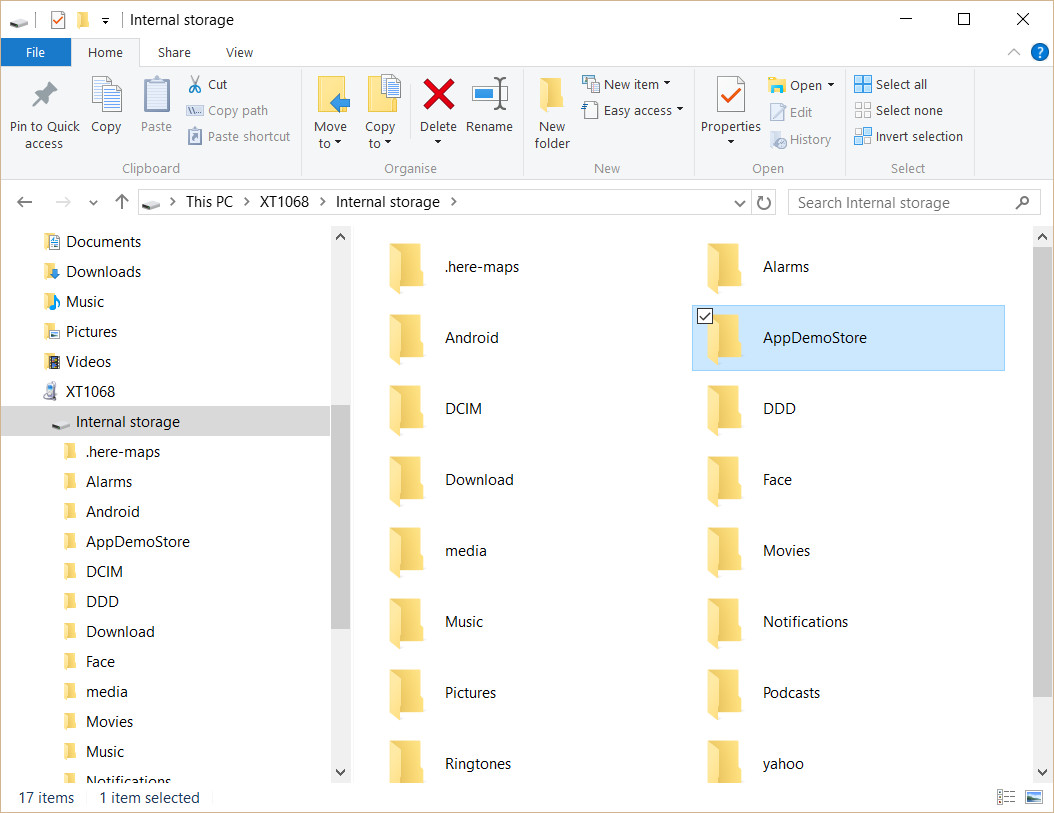
With Windows Explorer - or Finder if you're using a Mac - locate the Internal Storage of your android device.
4 Create a folder for AppDemoStore demos

Inside the Internal Storage folder, create a new folder called AppDemoStore.

Copy your downloaded demo into the AppDemoStore folder. As mentioned, make sure your demo is unzipped and you can locate the demo HTML file - you'll need that in the next step.
5 Open the Android Chrome browser

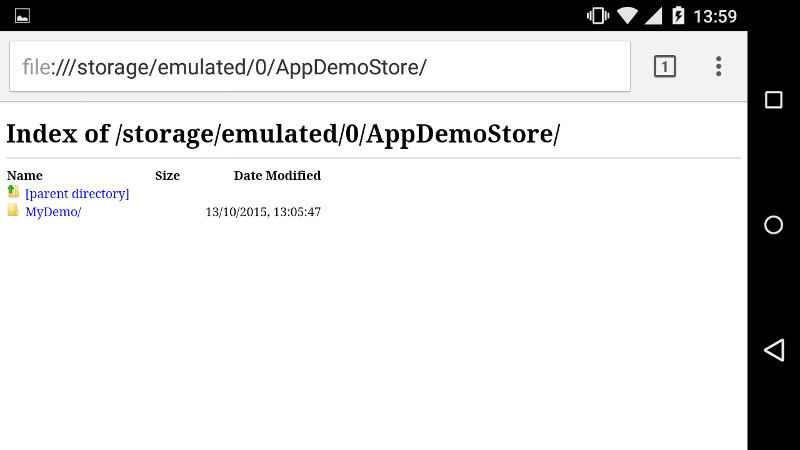
On your device: open the Chrome browser and type into the URL input:
file:///storage/emulated/0/AppDemoStore/

Then tap the demo folder - in this example "MyDemo".
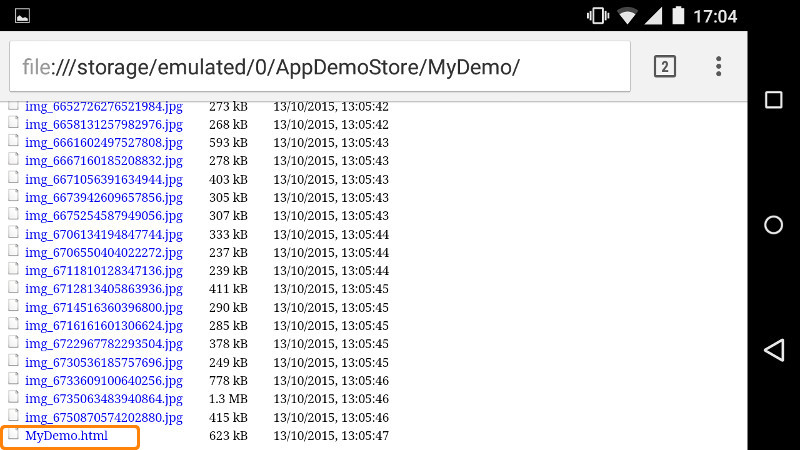
6 Open the demo HTML file

This is the final step: run the demo HTML file. Your demo should open in the browser. It will also run locally, without the need of an internet connection.
You can also bookmark it or add it to the home screen.

September 17, 2015

HOW TO: Embed a Demo in an Android App

One cool feature of AppDemoStore demos is that you can easily embed them in your existing Android apps. This is an easy way to provide a guided tutorial for your users so they'll quickly get introduced to your app.

To learn how to create a demo on AppDemoStore, please read this tutorial: How to Create Android App Demo

Click through the demo on the right to see a sample clickable app tutorial for Napster App.


How it works


1 Embed the hosted demo in your app

Once you have the demo up and running on AppDemoStore, you can easily embed it in your Android app. To do this, just copy the code provided below to your Android project (replace the demo-id marked with red with your own).

WebView webView = new WebView(this);
webView.getSettings().setJavaScriptEnabled(true);
String urlDemo = "http://www.appdemostore.com/m/ 6015879590445056 ";
webView.loadUrl(urlDemo);

Alternatively, you can get the code from the Demo Page: click on then click on and copy the code provided there.


2 Embed the downloaded demo in your app

You can download a demo as HTML or ZIP and include it in your app without hosting it on AppDemoStore. This will make sure that the demo will run also without internet connection.
To download your demo: click on the Demo Page, then click


The embed code is the same as provided in section 1 only that you just have to replace the link to the hosted demo with the link to the demo in the Android app project.


Helpful Articles